A Drupal 7 to 8 migration is anything but boring because there are so many ways to perform a migration! Depending on the complexity of the project, we can choose a technique that suits it best. The one we are going to discuss in this blog is to migrate content and configuration from Drupal 7 to Drupal 8 using a CSV import method.
Drupal provides various modules for importing data from different sources like JSON, XML and CSV. Drupal 8 core migration API system offers a whole suite of APIs that can essentially handle any kind of a migration from a previous version of Drupal to Drupal 8.
Some prep Work before the Drupal 7 to 8 migration
In order to migrate from Drupal 7 to Drupal 8 using CSV import, we will need these modules.
Drupal 7 Modules -
- Views Data export: This module needs to be installed in our Drupal 7 site. The Views Data export module helps in exporting the data in CSV format.
- Views Password Field: This module helps to migrate passwords which will send passwords in hashed format.
Drupal 8 Modules -
- Migrate – The Drupal 8 Migrate module helps in extracting data from various sources to Drupa 8.
- Migrate Plus – This Drupal 8 module will help in manipulating the imported source data
- Migrate Drupal – This module offers support in migrating content and configurations to Drupal 8.
- Migrate source CSV – This module offers a source plugin that can migrate entities and content to Drupal 8 from .csv files.
- Migrate Tools – This Drupal 8 module helps by offering UI tools/Drush commands to manage migrations.
- Configuration Development Module – This module helps in importing configuration files to Drupal 8.
Let the Drupal 8 migration begin!
First, we need to create a custom module for our Drupal 8 migration. Let’s name this module as test_migrate. And we know that after creating a custom module we need to create the info.yml file.
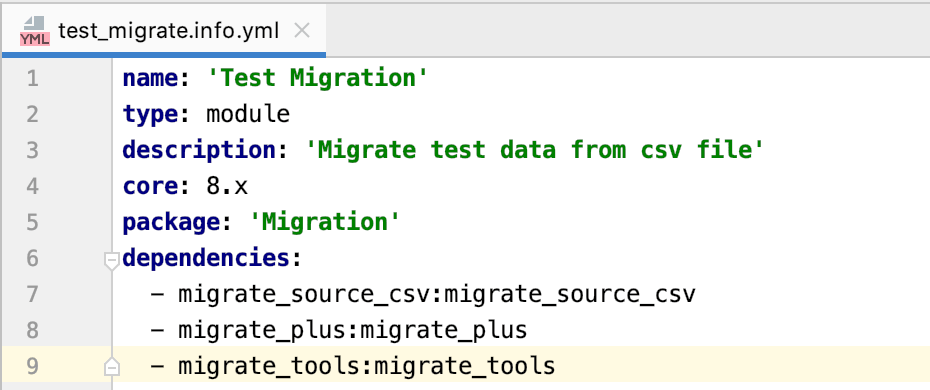
Above screenshot shows keys that are required for info.yml.
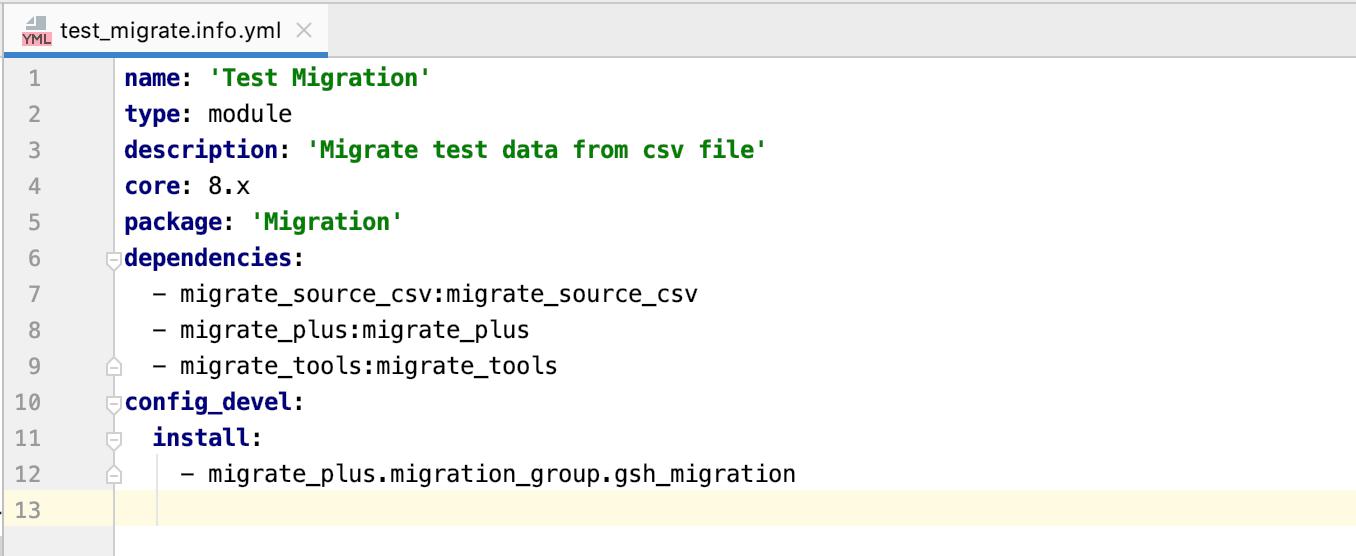
Once the info.yml file is created, we need to create a migration group for the migration. This migration group needs to be created in the path: test_migration > config > install. Name of the group should be migrate_plus.migration_group.test_migration.yml.

Above screenshot shows the folder structure to create a migration group.
Inside the migrate_plus.migration_group.test_migration.yml file, we need to write id, label and description for the migration group which is shown in the screenshot below.

After creating the migration group, we need to install this group in our info.yml file.
Now, we are going to write a migration script for the Users, Taxonomy term, Paragraphs, Content types. Note that you are migrating in the same order since there will be a link between these entities. For example, content will be created by a particular user - so we first need to migrate users and after that taxonomy, content type.
Now let’s write a script in yaml file for user migration. So, in order to write user migration, we need user yaml file with the name migrate_plus.migration.test_migration_users.yml and script for migration is shown below.
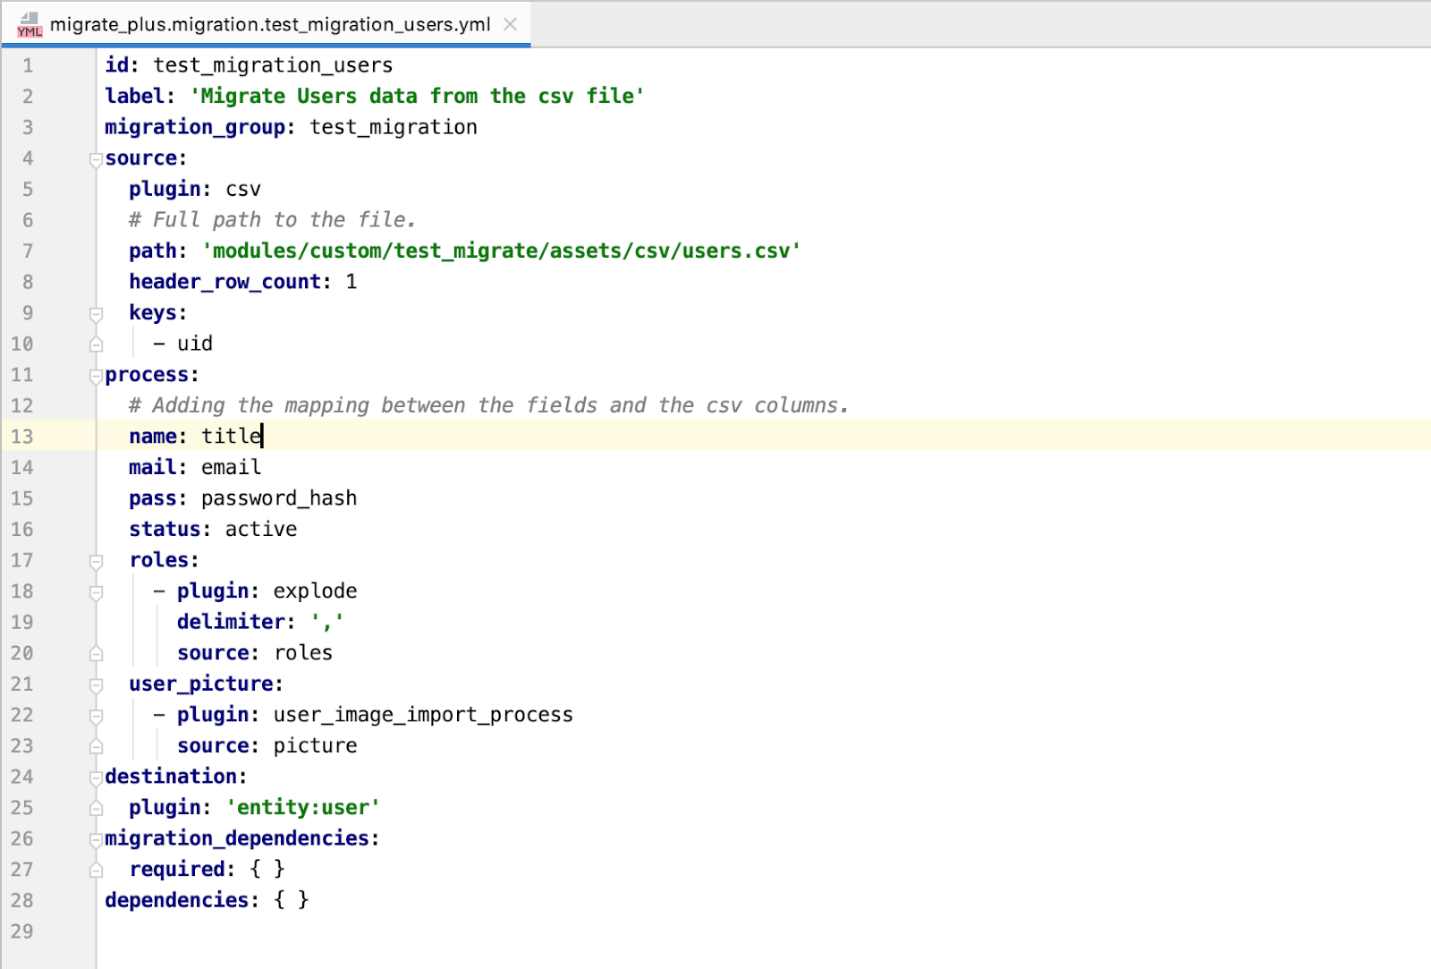
These are the keys required for migration here source csv file which we need to be migrated. Csv files should be placed in the path assets > csv > user.csv. Users.csv is also shown below.

Path - It indicates the path for the csv file.
header_row_count - This will give row count which is the header of a particular column.
Keys - which should be unique for every row.
Process - In this we are mapping csv files to fields.
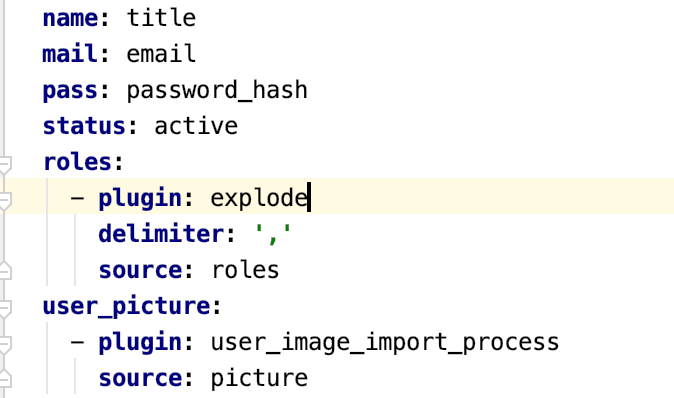
Above image shows the mapping between fields and csv. Here, the name is the machine name of the user name field and title is the csv column title. If we have multiple data for a single field, then we use delimiters. Users may have multiple roles in that case we write like shown in the above image.
Images are migrated by writing custom plugin. Custom plugin can be written in the path src > plugin > migrate > process. In the above picture you can see that the user_image_import_process is a custom plugin written to migrate user images.

Inside UserImportProcess.php we are writing the function which will copy the image and save it to the destination. Script is shown in the image below.
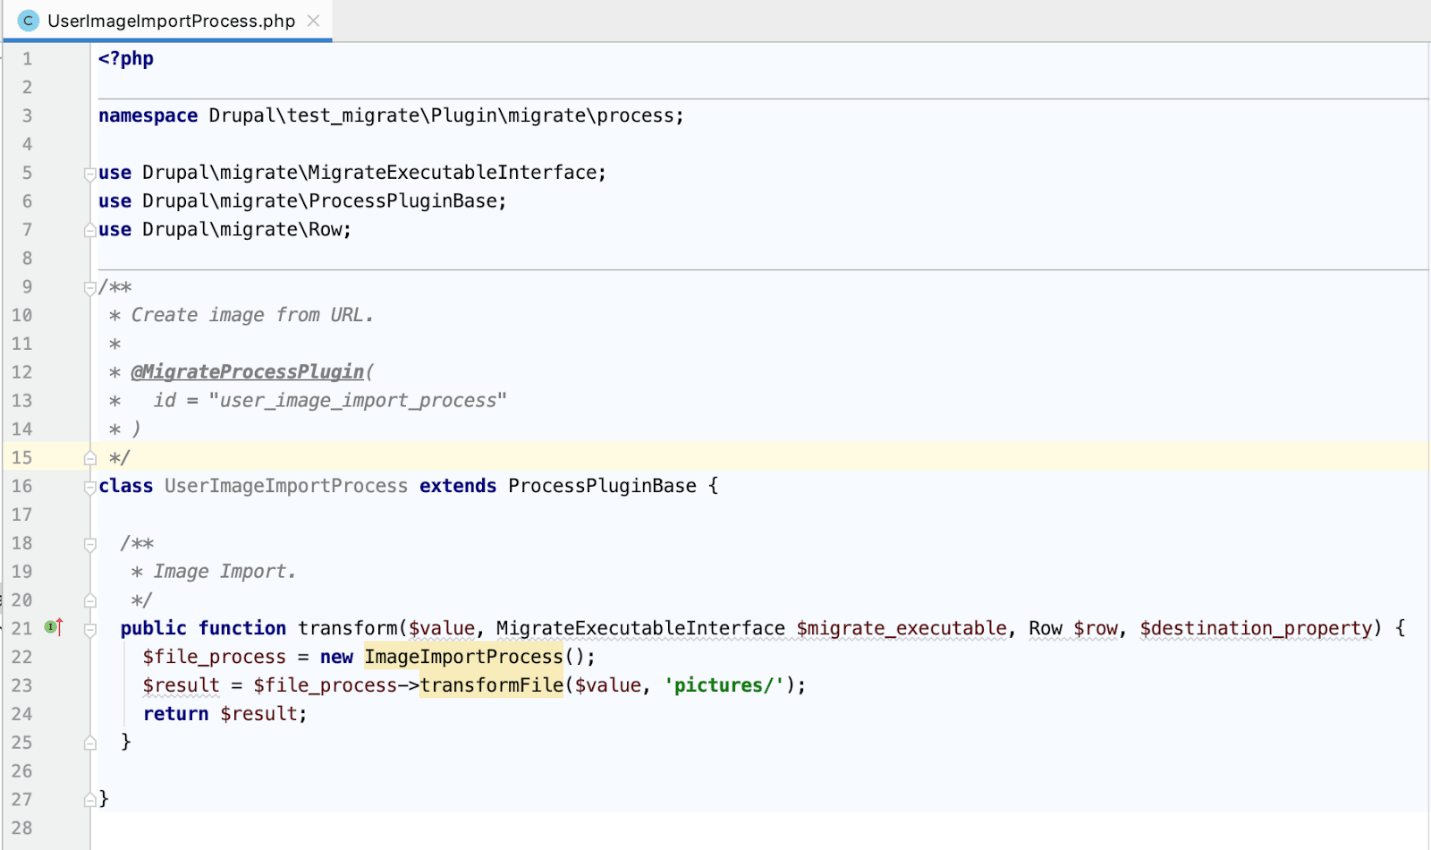
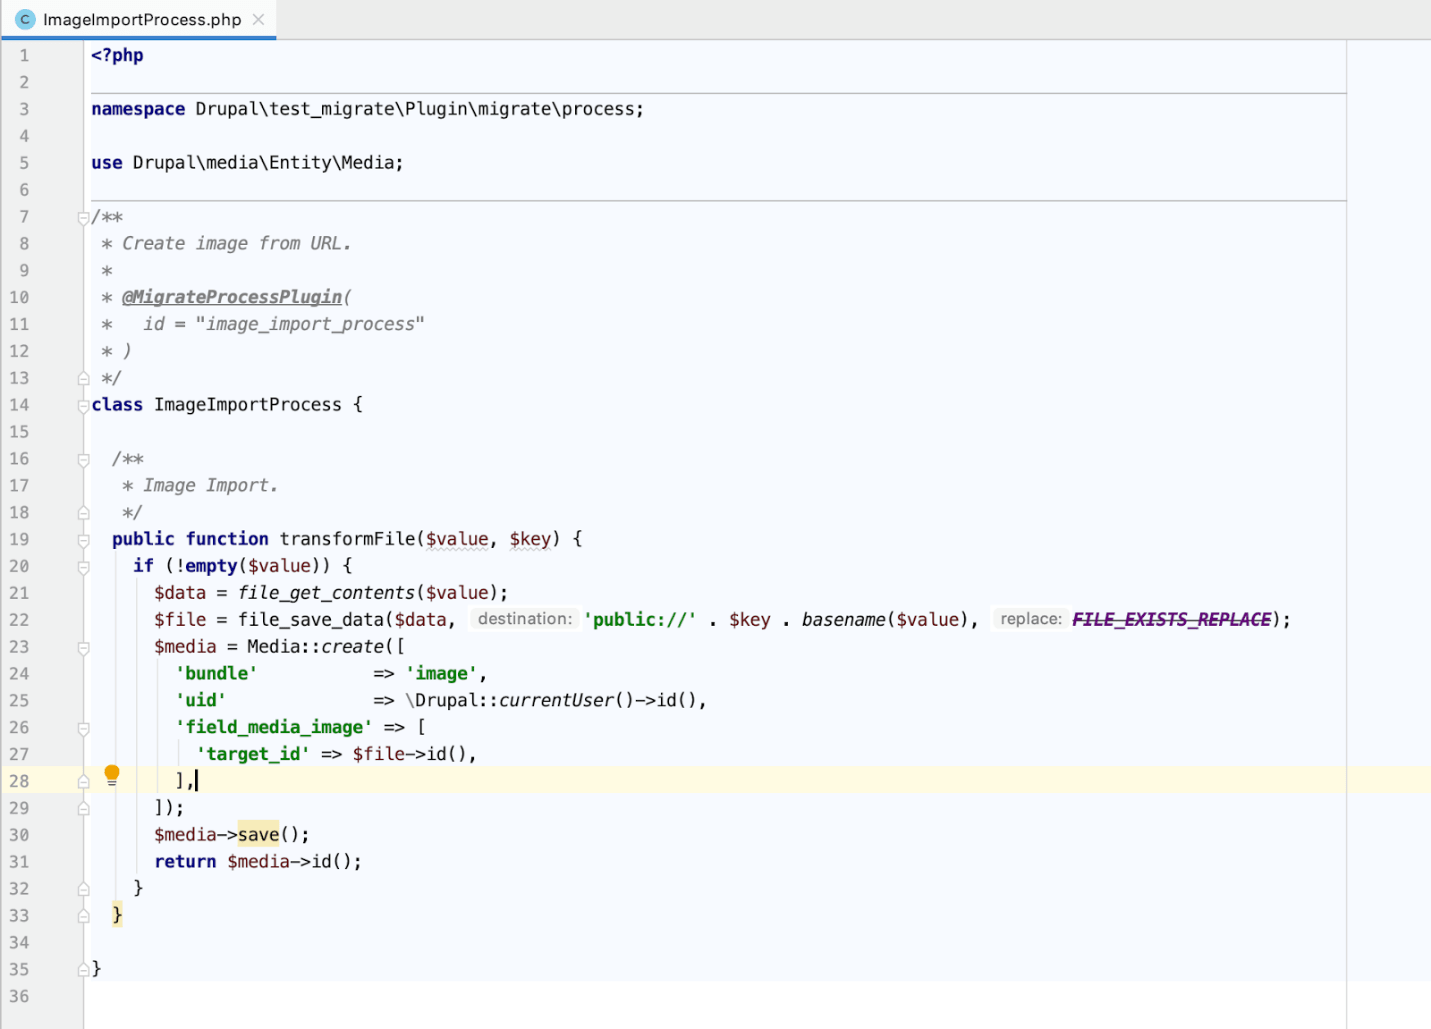
In order to identify where images should be saved we will write one more function ImageImportprocess. In that function we will mention the machine name of the image.
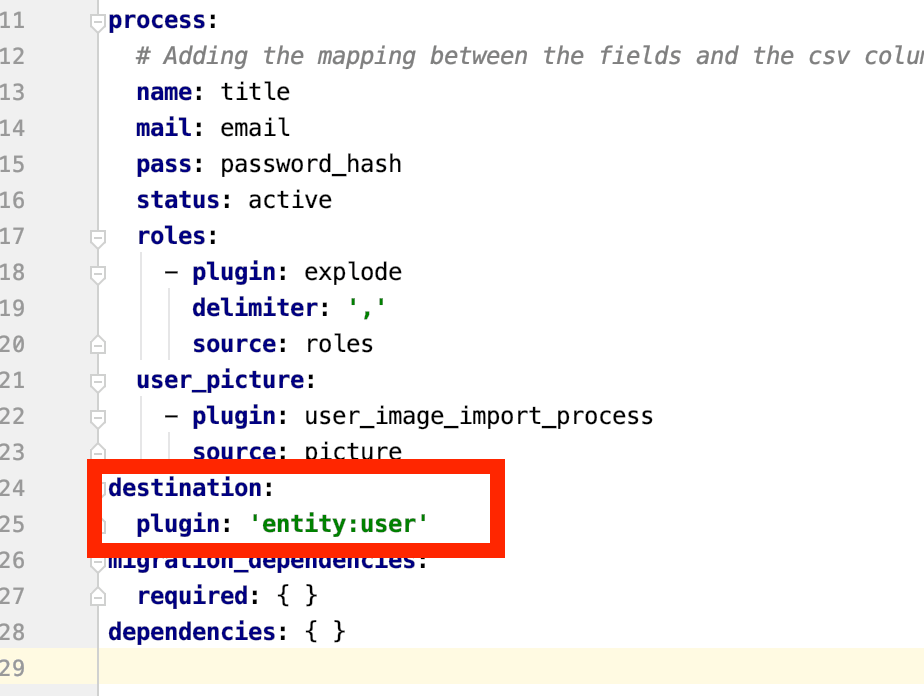
In the users info.yml file there is a destination section which will indicate where the migrated data is to be stored and which is an entity. This is marked in the image below.
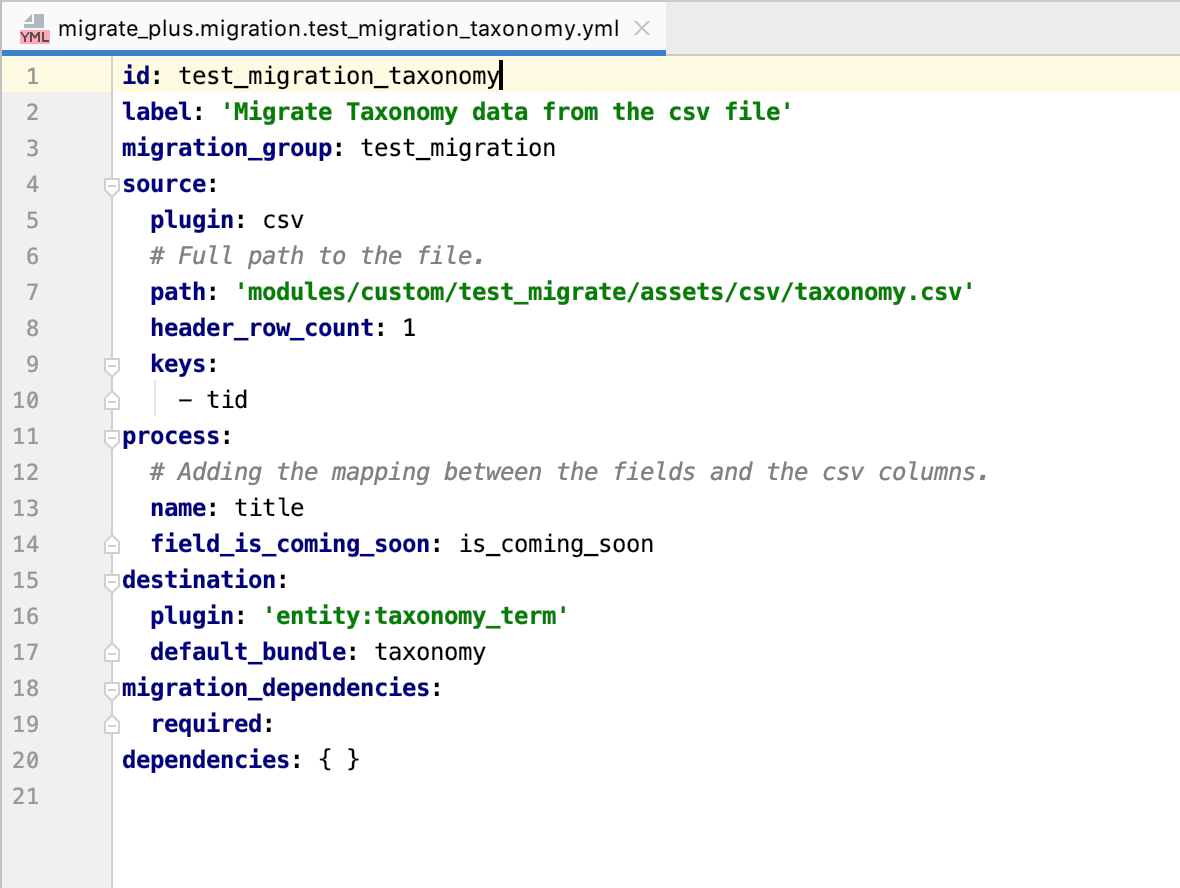
After creating code for users, we need to write yaml for taxonomy terms. Note that if you have only title field in your taxonomy then you do not need to write a separate yaml file. If you have multiple fields in taxonomy term, then you need to write a separate yaml file. In taxonomy terms we will have tid as key since tid will be unique for each term.
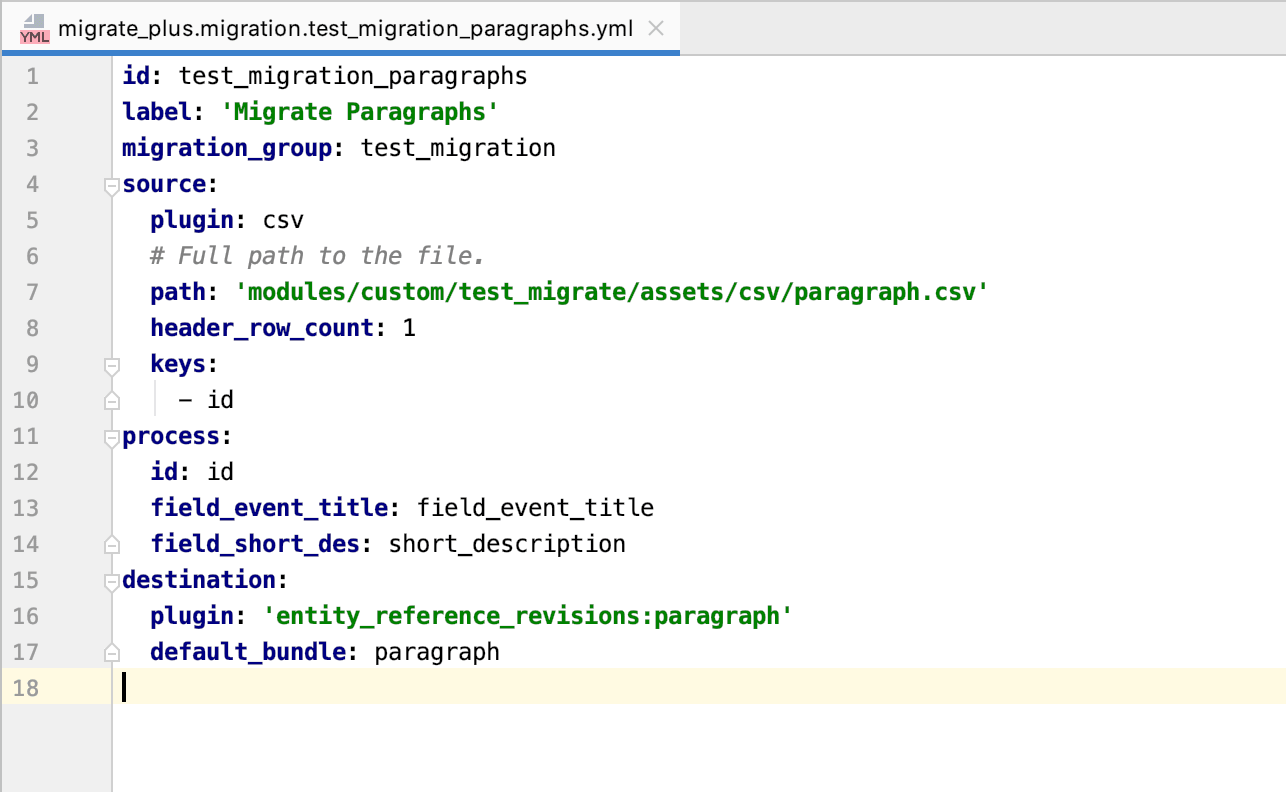
After this we will migrate paragraphs. For that we need to create a separate yaml file. The code to migrate is shown in the below image.
Lastly, lets migrate the content type. The yaml file for the content type is shown in the code below.
label: 'Migrate Content type data from the csv file'
migration_group: test_migration
source:id: test_migration_content
plugin: csv
# Full path to the file.
path: 'modules/custom/test_migrate/assets/csv/content.csv'
header_row_count: 1
keys:
- nid
process:
# Adding the mapping between the fields and the csv columns.
title: title
promote: promoted_to_front_page
sticky: sticky
field_display_name: display_name
field_marketing_tagline: marketing_tagline
field_taxonomy:
plugin: entity_lookup
source: Taxonomy
entity_type: taxonomy_term
bundle_key: vid
bundle: taxonomy
value_key: name
body/value: body
body/format:
plugin: default_value
default_value: "full_html"
field_paragraph:
- plugin: explode
delimiter: "|"
source: fcid
- plugin: skip_on_empty
method: process
- plugin: migration_lookup
migration: test_migration_paragraphs
no_stub: true
- plugin: iterator
process:
target_id: '0'
target_revision_id: '1'
destination:
plugin: 'entity:node'
default_bundle: content
migration_dependencies:
required:
- test_migration_paragraph
- test_migration_taxonomy
dependencies: { }
After writing all the yaml files the migration test_migrate.info.yml will contain the below installs.

Once you finish all these steps, go to your site and install your custom module.
Next, go to your project in terminal and run this “drush ms” command to check migration status as shown in the below image.

To migrate use command drush mim migration-id . We can see the migration ID in the above image.
Once done, if you check the migration status you can see the number of migrated items.

Now you can observe that all the content is migrated. If there is any error in the data migration, the process will terminate at that particular instance. Check the issue with that content and then once again you can restart the migration.
Things to Remember
- If the migration is terminated in between the process, the status of migration will display as “importing”. In order to change the status to idle you need to run the command drush mrs migration-id. Next, run command drush mim migration-id
- If you want rollback the migrated content, then run the command drush mr migration-id
- If you have changed anything in the code after starting the migration process, then make sure you run the command drush cdi test_migration. This command will help you to reflect the changes while migrating. Once done, do a thorough check on your site to see if all the content is migrated.