In this post, we will discuss about How to draw route on Google Maps between two points.

First, we need a Google Map integration on our app. To do this, visit
- https://developers.google.com/maps/documentation/android-api/signup
- Click the Get A Key button
You will see a dialog box similar to the one below.
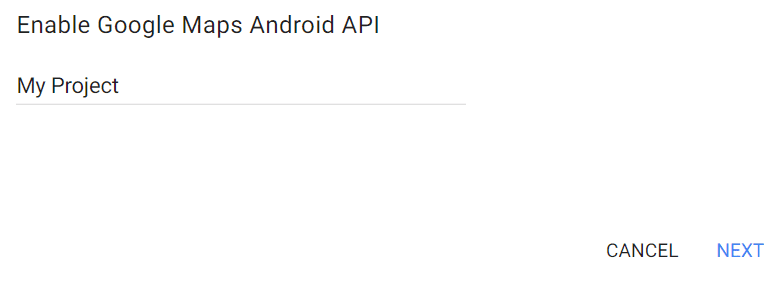
Create a New Project and click Next. You will be presented with an API Key like the one below.
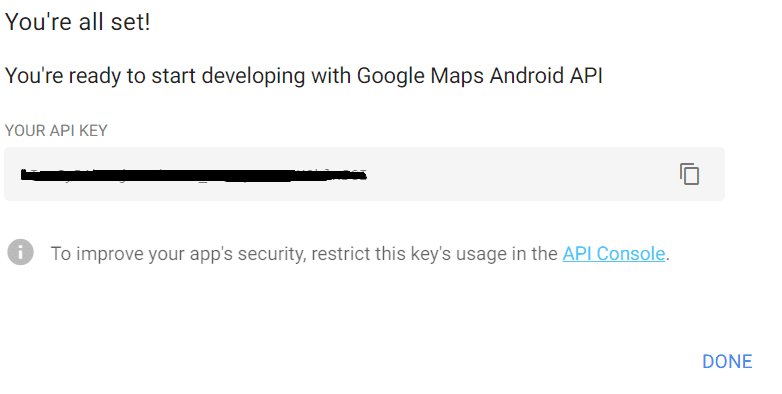
Suppose, if you choose to restrict this key usage, Click on API Console. Else, Click DONE.
In the API Console you can Restrict the Key usage only for Websites, Android apps, IOS apps etc.
On clicking the API Console, you will be redirected to another page with the Creation date, Created by etc. Choose the API Key where it should be restricted and then Click on the Android Apps Radio Button.
Suppose you want to Restrict usage to your android apps, add Package name and fingerprint.
You can get the package name from Androidmanifest.xml file.
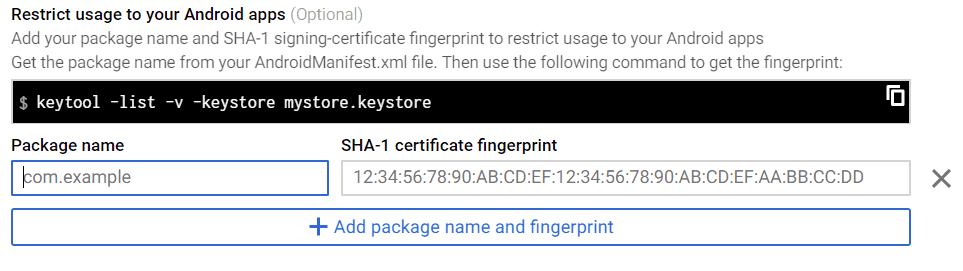
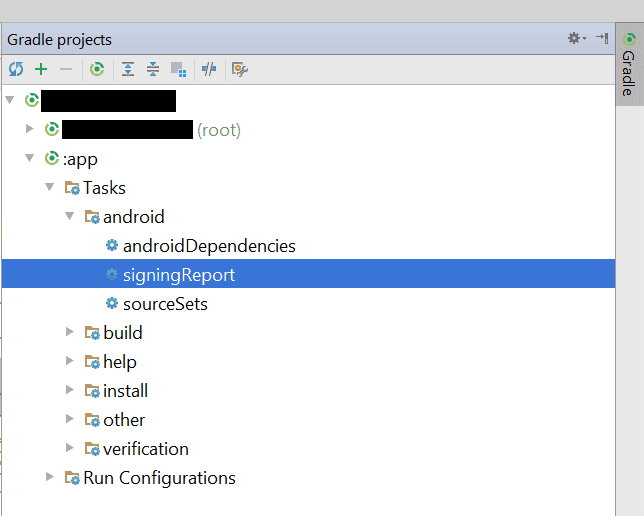
In order to add fingerprint, you must obtain the SHA-1 certificate. For that, visit Android Studio and open the Gradle File at the right corner.
Further, click on App gradle >> Tasks >> android >> signingreport
Copy the SHA-1 certificate and paste the same in the SHA-1 fingerprint box as shown in the above image. At last, click the SAVE button.
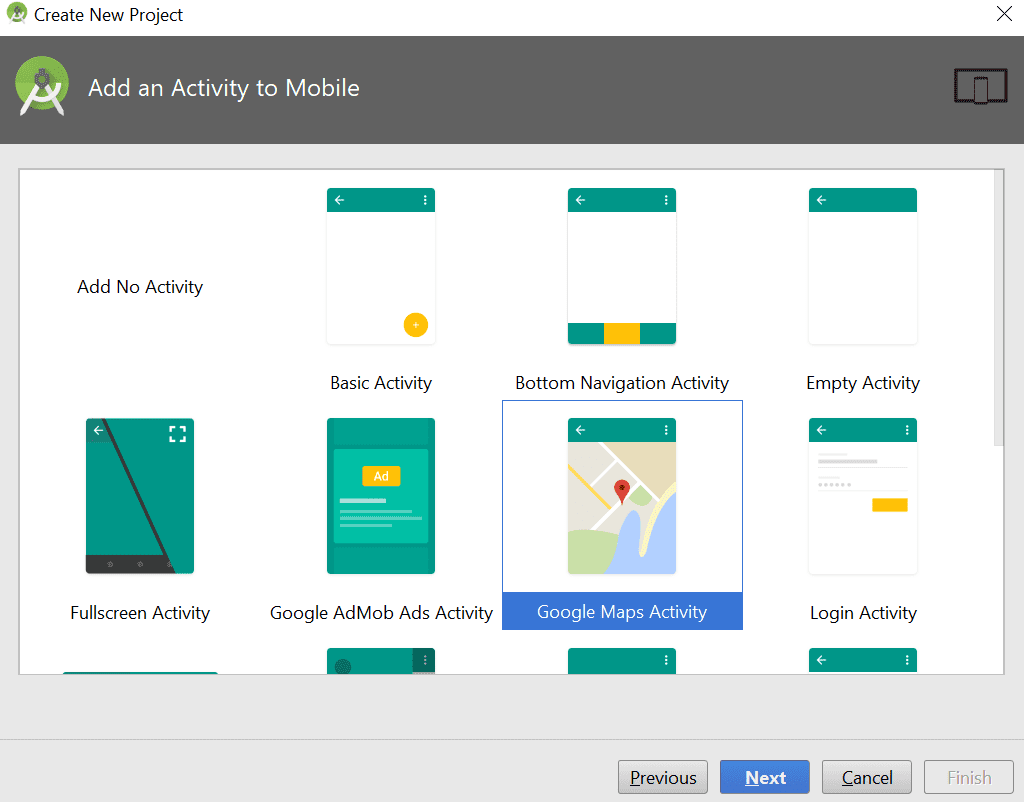
Now create a New Android Project with the name, company domain, and other details. Choose your Android version as Lollipop, and choose the draw route on Google Map Activity as shown below. Now click next and finish button.
After creating project you can see some files such as
- MapsActivity.java
- Activity_maps.xml
- google_maps-api.xml
First, change the google_map_api.xml. In this file, add the Google API Key which we created before.
<string	name="google_maps_key"	templateMergeStrategy="preserve"
translatable="false">API Key</string>
Next up, change the Androidmanifest.xml file
- Internet Connection - To communicate with api and to get location
- READ_GSERVICES - Whenever an app want to use the Google Service Framework
- ACCESS_COARSE_LOCATION - It will determine the user location using Wifi and mobile data. It will give Approximated location
- ACCESS_FINE_LOCATION- It will determine user location by using GPS. It will give you exact location.
- Also, add the meta-data tag in application tag which contains API key value
Androidmanifest.xml file looks like below
<manifest xmlns:android="schemas.android.com/apk/res/android"
   package="com.example.drawroutes">

   <uses-permission android:name="android.permission.INTERNET" />
   <uses-permission android:name="android.permission.WRITE_EXTERNAL_STORAGE" />
<uses-permission android:name="com.google.android.providers.gsf.permission.READ_GSERVICES" />
   <uses-permission android:name="android.permission.ACCESS_COARSE_LOCATION" />
   <uses-permission android:name="android.permission.ACCESS_FINE_LOCATION" />

   <application
       android:allowBackup="true"
       android:icon="@mipmap/ic_launcher"
       android:label="@string/app_name"
       android:roundIcon="@mipmap/ic_launcher_round"
       android:supportsRtl="true"
       android:theme="@style/AppTheme">
       <meta-data
           android:name="com.google.android.geo.API_KEY"
           android:value="@string/google_maps_key" />

       <activity android:name=".MapsActivity"
           android:label="@string/title_activity_maps">
           <intent-filter>
               <action android:name="android.intent.action.MAIN" />
               <category android:name="android.intent.category.LAUNCHER" />
           </intent-filter>
       </activity>

   </application>

</manifest>
Now change the in build.gradle file. While changing, make sure that you add the two dependencies, which are:
- implementation 'com.google.android.gms:play-services-maps:11.8.0'
- implementation 'com.google.android.gms:play-services-location:11.8.0'
While the 1st dependency is used to display the google map, 2nd dependency is used to get Google location and Activity recognition.
So the build.gradle file looks like below
apply plugin: 'com.android.application'

android {
   compileSdkVersion 26
   defaultConfig {
       applicationId "com.example.drawroutes"
       minSdkVersion 19
       targetSdkVersion 26
       versionCode 1
       versionName "1.0"
       testInstrumentationRunner "android.support.test.runner.AndroidJUnitRunner"
   }
   buildTypes {
       release {
           minifyEnabled false
           proguardFiles getDefaultProguardFile('proguard-android.txt'), 'proguard-rules.pro'
       }
   }
}

dependencies {
   implementation fileTree(dir: 'libs', include: ['*.jar'])
   implementation 'com.android.support:appcompat-v7:26.1.0'
   implementation 'com.google.android.gms:play-services-maps:11.8.0'
   implementation 'com.google.android.gms:play-services-location:11.8.0'
}
Let us begin with with MapsActivity. In this activity we set the layout file named as Activity_maps
In this xml file define a Fragment, and declare id and name for the fragment. Finally the xml is as shown below.
<fragment xmlns:android="schemas.android.com/apk/res/android"
   xmlns:tools="schemas.android.com/tools"
   android:id="@+id/map"
   android:name="com.google.android.gms.maps.SupportMapFragment"
   android:layout_width="match_parent"
   android:layout_height="match_parent"
   tools:context="com.example.drawroutes.MapsActivity" />
Here you are declaring android: name="com.google.android.gms.maps.SupportMapFragment" because we are extending the activity from FragmentActivity. If you want to use MapFragment then you can extend Activity.
Next, extend MapsActivity where the id is defined in this manner:
Final SupportMapFragment	mapFragment	=(SupportMapFragment)
getSupportFragmentManager() .findFragmentById(R.id.map);
Let us divide the code here and discuss one after the other. At first, you need to instantiate the GoogleMap class.
Now declare the map onClick Listner
mMap.setOnMapClickListener(new GoogleMap.OnMapClickListener() {

   @Override
   public void onMapClick(LatLng point) {

       // Already two locations
       if (MarkerPoints.size() > 1) {
           MarkerPoints.clear();
           mMap.clear();
       }

       // Adding new item to the ArrayList
       MarkerPoints.add(point);

       // Creating MarkerOptions
       MarkerOptions options = new MarkerOptions();

       // Setting the position of the marker
       options.position(point);

       /**
        * For the start location, the color of marker is GREEN and
        * for the end location, the color of marker is RED.
        */
       if (MarkerPoints.size() == 1) {
           options.icon(BitmapDescriptorFactory.defaultMarker(BitmapDescriptorFactory.HUE_GREEN));
       } else if (MarkerPoints.size() == 2) {
           options.icon(BitmapDescriptorFactory.defaultMarker(BitmapDescriptorFactory.HUE_RED));
       }


       // Add new marker to the Google Map Android API V2
       mMap.addMarker(options);

       // Checks, whether start and end locations are captured
       if (MarkerPoints.size() >= 2) {
           LatLng origin = MarkerPoints.get(0);
           LatLng dest = MarkerPoints.get(1);

           // Getting URL to the Google Directions API
           String url = getUrl(origin, dest);
           Log.d("onMapClick", url.toString());
           FetchUrl FetchUrl = new FetchUrl();

           // Start downloading json data from Google Directions API
           FetchUrl.execute(url);
           //move map camera
           mMap.moveCamera(CameraUpdateFactory.newLatLng(origin));
           mMap.animateCamera(CameraUpdateFactory.zoomTo(11));
       }

   }
});
Above shown code will be executed when user taps on an Android screen. This is used to place the marker at the points between which path will be drawn.
MarkerPoints.get() is used to access and store the Coordinates of the two points. It will be stored in LatLng origin and destination.
And getUrl is used to fetch the URL and implemented using Async Task.
Async Task:Async Task is an Abstract class provided by Android, which helps to use the UI thread. Async Task class allows us to perform long running operations or Background operations and display the results on UI Thread without affecting the main thread. Async Task is used to run tasks/operations that need to be performed at background asynchronously. In Async Task class there are two methods.
- doInbackground : Task will be implemented in this method.
- onPostExecute: Result will be shown in this method.
private class FetchUrl extends AsyncTask<String, Void, String> {

   @Override
   protected String doInBackground(String... url) {

       // For storing data from web service
       String data = "";

       try {
           // Fetching the data from web service
           data = downloadUrl(url[0]);
           Log.d("Background Task data", data.toString());
       } catch (Exception e) {
           Log.d("Background Task", e.toString());
       }
       return data;
   }

   @Override
   protected void onPostExecute(String result) {
       super.onPostExecute(result);

       ParserTask parserTask = new ParserTask();

       // Invokes the thread for parsing the JSON data
       parserTask.execute(result);

   }
}
downloadUrl: This is used to fetch the URL from web service and its result will be parsed using ParserTask. This is also an Async Task.
private String downloadUrl(String strUrl) throws IOException {
   String data = "";
   InputStream iStream = null;
   HttpURLConnection urlConnection = null;
   try {
       URL url = new URL(strUrl);

       // Creating an http connection to communicate with url
       urlConnection = (HttpURLConnection) url.openConnection();

       // Connecting to url
       urlConnection.connect();

       // Reading data from url
       iStream = urlConnection.getInputStream();

       BufferedReader br = new BufferedReader(new InputStreamReader(iStream));

       StringBuffer sb = new StringBuffer();

       String line = "";
       while ((line = br.readLine()) != null) {
           sb.append(line);
       }

       data = sb.toString();
       Log.d("downloadUrl", data.toString());
       br.close();

   } catch (Exception e) {
       Log.d("Exception", e.toString());
   } finally {
       iStream.close();
       urlConnection.disconnect();
   }
   return data;
}
Here data will be returned in the form of Json. which user can get using HttpURLConnection.
Parser Task: Define new class with the name ParserTask which extends AsyncTask. Parse the Json data returned by downloadUrl method.
private class ParserTask extends AsyncTask<String, Integer, List<List<HashMap<String, String>>>> {

   // Parsing the data in non-ui thread
   @Override
   protected List<List<HashMap<String, String>>> doInBackground(String... jsonData) {

       JSONObject jObject;
       List<List<HashMap<String, String>>> routes = null;

       try {
           jObject = new JSONObject(jsonData[0]);
           Log.d("ParserTask",jsonData[0].toString());
           DataParser parser = new DataParser();
           Log.d("ParserTask", parser.toString());

           // Starts parsing data
           routes = parser.parse(jObject);
           Log.d("ParserTask","Executing routes");
           Log.d("ParserTask",routes.toString());

       } catch (Exception e) {
           Log.d("ParserTask",e.toString());
           e.printStackTrace();
       }
       return routes;
   }

   // Executes in UI thread, after the parsing process
   @Override
   protected void onPostExecute(List<List<HashMap<String, String>>> result) {
       ArrayList<LatLng> points;
       PolylineOptions lineOptions = null;

       // Traversing through all the routes
       for (int i = 0; i < result.size(); i++) {
           points = new ArrayList<>();
           lineOptions = new PolylineOptions();

           // Fetching i-th route
           List<HashMap<String, String>> path = result.get(i);

           // Fetching all the points in i-th route
           for (int j = 0; j < path.size(); j++) {
               HashMap<String, String> point = path.get(j);

               double lat = Double.parseDouble(point.get("lat"));
               double lng = Double.parseDouble(point.get("lng"));
               LatLng position = new LatLng(lat, lng);

               points.add(position);
           }

           // Adding all the points in the route to LineOptions
           lineOptions.addAll(points);
           lineOptions.width(10);
           lineOptions.color(Color.RED);

           Log.d("onPostExecute","onPostExecute lineoptions decoded");

       }

       // Drawing polyline in the Google Map for the i-th route
       if(lineOptions != null) {
           mMap.addPolyline(lineOptions);
       }
       else {
           Log.d("onPostExecute","without Polylines drawn");
       }
   }
}
Here, the “doInBackround” will parse the data. In the “onPostExecute” method we will add the polyline to draw route on Google Map.
By following these methods, we are parsing the data to another class i.e DataParser
class DataParser {

   List<List<HashMap<String,String>>> parse(JSONObject jObject){

       List<List<HashMap<String, String>>> routes = new ArrayList<>() ;
       JSONArray jRoutes;
       JSONArray jLegs;
       JSONArray jSteps;

       try {

           jRoutes = jObject.getJSONArray("routes");

           /** Traversing all routes */
           for(int i=0;i<jRoutes.length();i++){
               jLegs = ( (JSONObject)jRoutes.get(i)).getJSONArray("legs");
               List path = new ArrayList<>();

               /** Traversing all legs */
               for(int j=0;j<jLegs.length();j++){
                   jSteps = ( (JSONObject)jLegs.get(j)).getJSONArray("steps");

                   /** Traversing all steps */
                   for(int k=0;k<jSteps.length();k++){
                       String polyline = "";
                       polyline = (String)((JSONObject)((JSONObject)jSteps.get(k)).get("polyline")).get("points");
                       List<LatLng> list = decodePoly(polyline);

                       /** Traversing all points */
                       for(int l=0;l<list.size();l++){
                           HashMap<String, String> hm = new HashMap<>();
                           hm.put("lat", Double.toString((list.get(l)).latitude) );
                           hm.put("lng", Double.toString((list.get(l)).longitude) );
                           path.add(hm);
                       }
                   }
                   routes.add(path);
               }
           }

       } catch (JSONException e) {
           e.printStackTrace();
       }catch (Exception e){
       }


       return routes;
   }


   /**
    * Method to decode polyline points
    * */
   private List<LatLng> decodePoly(String encoded) {

       List<LatLng> poly = new ArrayList<>();
       int index = 0, len = encoded.length();
       int lat = 0, lng = 0;

       while (index < len) {
           int b, shift = 0, result = 0;
           do {
               b = encoded.charAt(index++) - 63;
               result |= (b & 0x1f) << shift;
               shift += 5;
           } while (b >= 0x20);
           int dlat = ((result & 1) != 0 ? ~(result >> 1) : (result >> 1));
           lat += dlat;

           shift = 0;
           result = 0;
           do {
               b = encoded.charAt(index++) - 63;
               result |= (b & 0x1f) << shift;
               shift += 5;
           } while (b >= 0x20);
           int dlng = ((result & 1) != 0 ? ~(result >> 1) : (result >> 1));
           lng += dlng;

           LatLng p = new LatLng((((double) lat / 1E5)),
                   (((double) lng / 1E5)));
           poly.add(p);
       }

       return poly;
   }
}
With the parse method you get Json data which can split JSONArray by using getJSONArray. Traverse all routes, points etc and add all the traversing points to the list.
routes.add(path);
Draw the route on Google map using polyline. This is done in onPostExecute Method in which ParseTask AsyncTask class.
@Override
protected void onPostExecute(List<List<HashMap<String, String>>> result) {
   ArrayList<LatLng> points;
   PolylineOptions lineOptions = null;

   // Traversing through all the routes
   for (int i = 0; i < result.size(); i++) {
       points = new ArrayList<>();
       lineOptions = new PolylineOptions();

       // Fetching i-th route
       List<HashMap<String, String>> path = result.get(i);

       // Fetching all the points in i-th route
       for (int j = 0; j < path.size(); j++) {
           HashMap<String, String> point = path.get(j);

           double lat = Double.parseDouble(point.get("lat"));
           double lng = Double.parseDouble(point.get("lng"));
           LatLng position = new LatLng(lat, lng);

           points.add(position);
       }

       // Adding all the points in the route to LineOptions
       lineOptions.addAll(points);
       lineOptions.width(10);
       lineOptions.color(Color.RED);

       Log.d("onPostExecute","onPostExecute lineoptions decoded");

   }

   // Drawing polyline in the Google Map for the i-th route
   if(lineOptions != null) {
       mMap.addPolyline(lineOptions);
   }
   else {
       Log.d("onPostExecute","without Polylines drawn");
   }
}
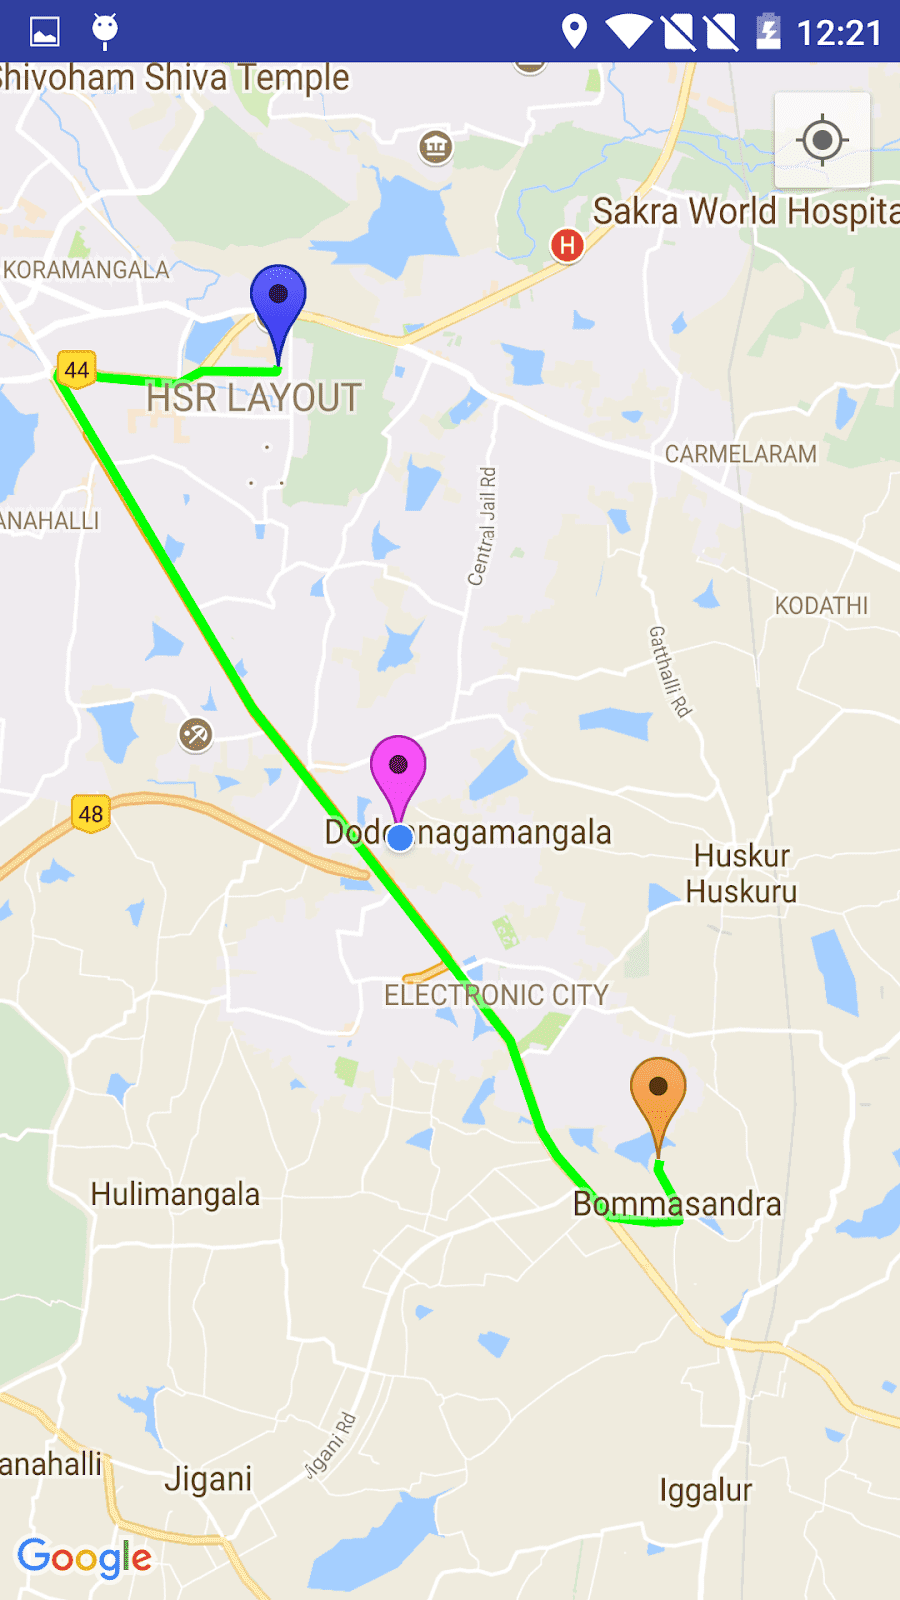
The above points are fetched from the result and draw a route on Google maps. Here ArrayList points are used to store the Latitude and Longitude positions on Google Map.
At last, the route is drawn on Google Map by using polyLine: lineOptions.addAll(points);
Add the polyline to map like: mMap.addPolyline(lineOptions);
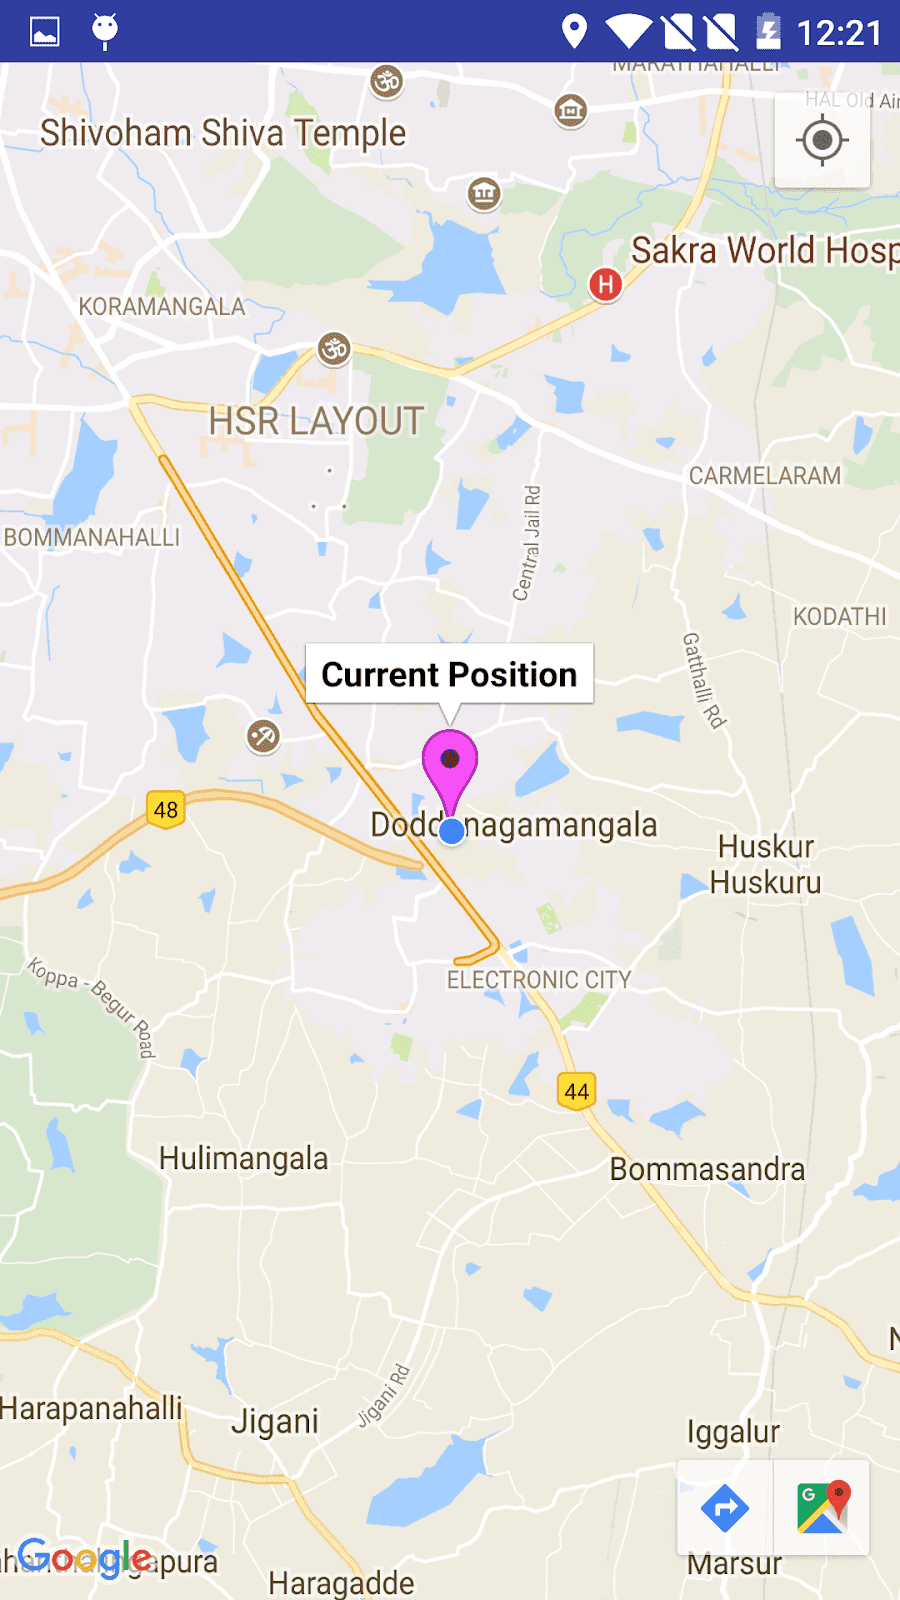
Finally run the application. It will run successfully. The output of the screen is as shown below.
Don't Miss Out!


