It’s easy, it's portable, it's fast and it can run anything, anywhere. We’re talking about Lando and it is quickly turning into our go-to DevOps tool that standardizes our development environment. The easiest way to describe Lando is that it simplifies development by automating environment set ups. In this article you will learn to get started with Lando and set up Drupal easily with its support.
What is Lando?
Lando is a free, open source, easy and powerful local development environment and DevOps tool that is built on Docker. It simulates your production environment locally and can run on OSX, Windows and Linux. Different types of services and tooling can be set quickly and painlessly. You can set different services per project and these will not affect other Lando projects.
System Requirements for Lando
Lando works on a wide range of computer devices with following requirements:
Operating System: macOS 10.13 or later | Windows 10 Pro+ or equivalent | Linux with kernel version 4.x or higher
Docker Engine: Docker is required for Lando.
Hardware: 8-core processor | 16GB+ RAM | 100GB+ of available disk space.
Installation
MacOS
- Install DMG via direct download: Download .dmg file from github and install by double click on .dmg file.
-
Install via HomeBrew (third party):
brew install --cask lando
Linux
- Install the Docker Community Edition
- Install Docker Compose
- Download the latest .deb, .pacman or .rpm package from GitHub
- Double click on the package and install via your distributions "Software Center" or equivalent.
Windows
- Download the latest Windows .exe installer from GitHub
- Double-click on lando.exe
- Go through the setup workflow
Drupal setup with Lando
You can install Drupal in different ways. For example, manually by downloading or using the composer command. The current version of Drupal uses composer dependent modules and libraries, so it is better to set up a project using the below composer base command.
composer create-project drupal/recommended-project lando-demoInitialising Lando
Now, let’s switch to the Drupal root directory and follow these steps :
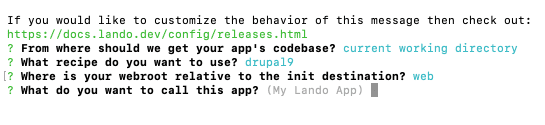
Step 1: ‘Lando init’ command - After running this command you will see the below option.
Step 2: Choose recipe - After choosing “Current working directory”, the recipe list will show up. Choose the Drupal recipe.
Step 3: Web root - After choosing the recipe, you will now see the web root option. Select “web” option. "Web" folder is generated during Drupal installation using composer.
Step 4: App name - After choosing the Web root folder, you will see an option for app name. For this example, let’s name it “First Lando”.
After successfully completing the above installation steps, a “.lando.yml” file will be generated with the above basic details.
The Lando file will always be in the app root. The Lando file is the heart of every Lando app. It tells the Lando app about services and tools that need to be run for this lando app development.
Drupal installation
After setting up Drupal and initializing Lando, you will now need a local development URL. So let us use the "Lando Start" command. After running this command you will get the URL as shown in the below image.
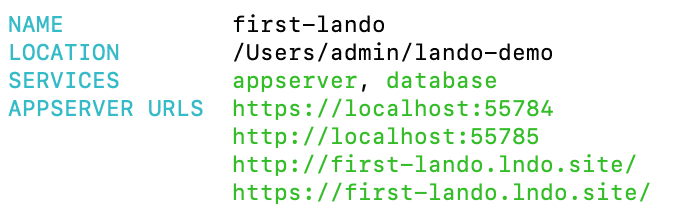
You will now need the database name, database password and host name. For that, let’s run the "Lando info" command.

Now you can complete the Drupal installation as usual with the above information.
Final thoughts
With Lando, you don’t need to manage local services and it is extremely easy to install and set up. If you’re quite familiar with Docker, customizing your setup with Lando will be very simple. This article will help you get started on working with Lando and Drupal. Stay updated with the latest in technology and open source by subscribing to our weekly newsletter here.

Ravikant
Related Insights


Don't Miss Out!


