If you own a website or are a developer, you know what kind of cookies we’re talking about. Around ten years ago when the EU passed the cookie law it made life a little more difficult, but hey, who is going to complain about consumer privacy? The good news is today there are easier ways to set up cookie compliance on websites and we’re going to talk about one of those approaches in this article.
But first, what is a cookie? Simply put, a cookie is a small piece of information created by a website while someone is browsing it. Most websites use cookies to gather information about their visitors. This little data packet is a widely used technology today and is also covered in the legislation. This legislation is known as the Cookie Law.
Let’s talk more about the Cookie Law
Cookie laws require websites to obtain users' consent before storing or retrieving any information about them. By these laws, the user has the power to choose whether or not to allow the collection of any data.
The cookie law was adopted by the EU in May 2011 as a directive initiative implemented across all EU countries. Eventually, each country updated its own law to adapt to the new situation.
There are various types of Cookie laws at the moment:
- GDPR: General Data Protection Regulation (GDPR)
- CCPA: California Consumer Privacy Act (CCPA)
- COPPA: Children’s Online Privacy Protection Act
General Data Protection regulation
It is a legal standard that protects the privacy information of European Union citizens. It affects any organization that stores user data even though the business does not possess a physical presence in the EU.
California Consumer Privacy Act
This act is specifically for Californian consumers. These laws help consumers to enquire about all the information a company collected about them.
Children’s Online Privacy Protection Act
This law deals with children between the age of 13-16. It bans companies from collecting any information about children under 13 without parents' consent.
Businesses can increase their credibility by complying with these laws. There are various privacy management software platforms helping businesses to attain this compliance. OneTrust is one such platform that provides techniques to prevent any data loss in the workplace.
What is OneTrust Cookie Banner and Why use it?
OneTrust banner is a module that scans, categorizes, and collects consent from visitors to a website. OT banners can be utilized and can be modified based on the regions. Now we will be taking you through the configuration, integration, and features of the OT banner.
Implementing OneTrust cookie banners offers users the following perks:
- Scans and categorizes the cookies on the website automatically
- Allows to choose a banner from various categories and provides a preview before publishing
- Configures consent models by geolocation
- The portal notifies of any complaint violations
- The portal audits the website on scheduled scanning
- A dashboard with users visiting the website over periods
- Wide variety of built-in banner templates for the user to choose from
- Multi-lingual support
From scanning to integration, the process happens in 5 steps.
Step 1: Scan the website
The initial step for OT banner implementation is to scan the website. But before scanning the website you will need to have an account with OT.
When a new website is added to the portal to scan, the scanner will be in a pending stage, which means that a new record is getting created and the scanner will start shortly.
This scanner scans the root domain, as well as any subdomains inside the root domain, that are fed into the portal. If the domain does not match with the banner integrated domain, then the consent will not work as expected. The scanner will treat any URL which starts with www as a subdomain.
Note: Only the root domain should be fed into the portal. Agreeing or disagreeing on the banner in either root or subdomain will be captured as one single input.
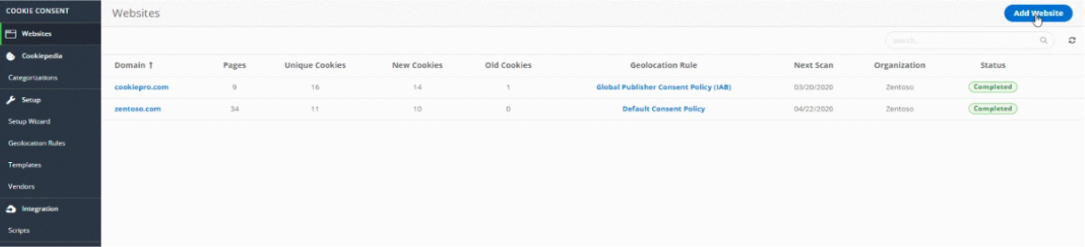
Steps to scan the website:
- Navigate to the website option after logging in.
- Add the Domain URL by clicking on the add URL button.
Optional configurations
While scanning a new website, OT gives you additional features like limiting the pages that require scanning, pages with a query parameter, and providing the sitemap URL of the website for scanning as shown in the image. It also gives the user the privilege to erase the previous history.
Additional features on this tab are scheduling the website scan over a certain period and reconfiguration of the banner and preference center templates if required.
Note: Limiting the pages helps reduce the scan time. It is recommended to set the page number between 100-500 pages since that will cover all the cookie categories on the site.
Step 2: Choose and design the template.
The cookie banner that the end user interacts with is designed and configured in these particular steps. The OT gives the developer prebuilt templates for the banner design. The template design happens in two parts.
- Cookie banner design:- This part deals with the banner that the end user sees with the initial content and the consent to accept or reject the cookies.
- Preference center design:- This acts more like a popup, which appears in the cookie banner as a settings button. The preference center holds the content that appears in the privacy statement of a website. It also sums ups the categories of the cookies and it allows the end user to either opt-in or opt-out of the cookies based on the categories.
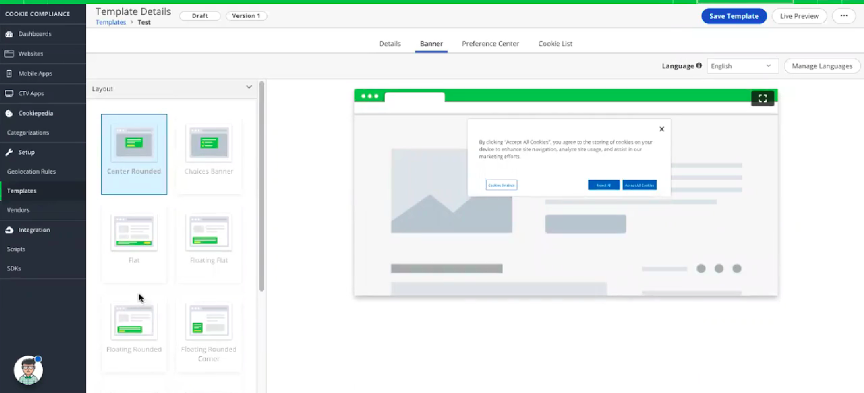
Steps to configure the banner and preference center.
- Navigate to the Template option
- Add the template based on the type of cookie law. Example GDPR cookie banner
- Add the name of the template. Fill in the optional fields if needed
- Click on Create
- Select the design of the template
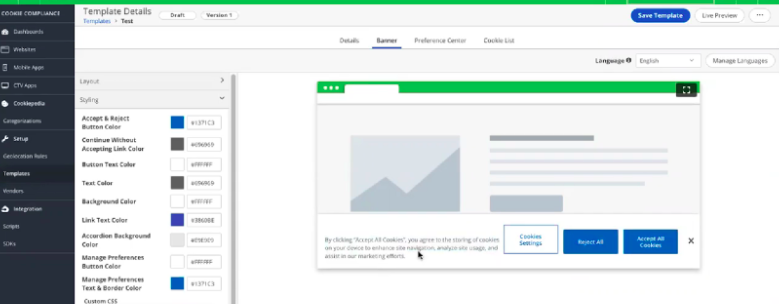
- Add the necessary content, button labels, and style of the template
Each time a template is published after making changes, the version of the template gets updated. It helps the user to have a backup of the previous design. Along with it, the 'Add language' option allows users to create the banner in multiple languages. The content in the default language gets translated based on the respective language.
Styling and configuration of the banner and preference center are completely managed within the OT itself. They support CSS as well as HTML tags.
Even though a common style for banners and preferences can be maintained, altering the banners respective to websites is also supported. To change the default banner style, the user has to navigate to the website and select the specific website. The option to change the banner style will be available within the respective site.
Step 3: Create a geolocation rule.
Geolocation rule places a vital role in this process of OT banner implementation. Geolocation determines the consent modal, behavior, and consent displayed in certain regions.
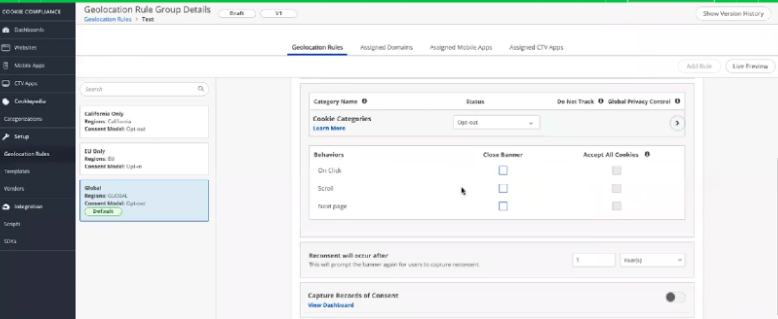
To configure the Geolocation rule:
- Navigate to Geolocation
- Add a new group of Rules
- Provide the name of the Rules
- Select the region where the Rules should apply if there are any
- Select the template that the Rules should use
- Enable/disable the show banner option as needed
- Select the cookie categories and the Status of the cookie (opt-in or opt-out)
- Integration of Google consent modal, to handle the Google tags
- The behavior of the banner (while closing the banner and accepting the banner)
- Add the re-consent period
- Capture a record of consent to log the user records
- Enable the setting to make the geolocation rule the default rule.
The consent modals for cookies are configured along with the geolocation rule. Consent modals are default behaviors configured for cookies for users to interact. Some consent modals are:
- Opt-in: By default, the cookies are in an enabled state
- Opt-out: By default the cookies are disabled
- Notify only: This type of modal lets the user knows about cookies and there are enabled by default. Users are restricted in changing their consent on these types of modals.
- Implied consent: The Cookies are not enabled until the user selects the accept button in the banner.
- Custom: The configuring person can create a customized behavior for the cookies like do not track etc.
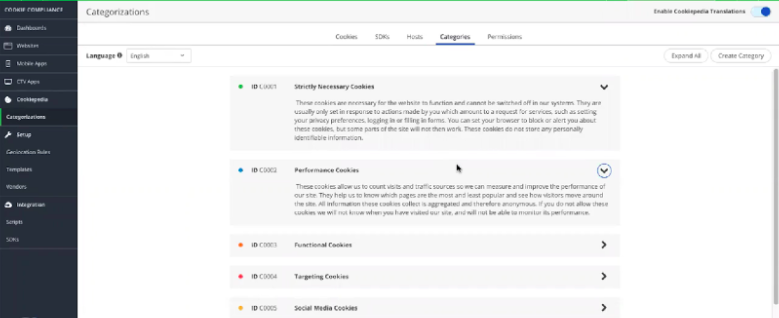
Step 4: Categorize the cookie
After scanning the website, the captured cookies are categorized based on the available categories in the OT platform. The developer also has the privilege to add new categories and can add the scanned cookies as well.
Some prebuilt categories:
- Strictly necessary cookies are cookies that are essential for the performance of the website.
- Analytical cookies are web stat tools like Google analytics.
- Functionality cookies are cookies used for enhancing the functionality of the website. But not 100% essential for the user.
- Social media cookies are related to social network cookies like Facebook and Twitter.
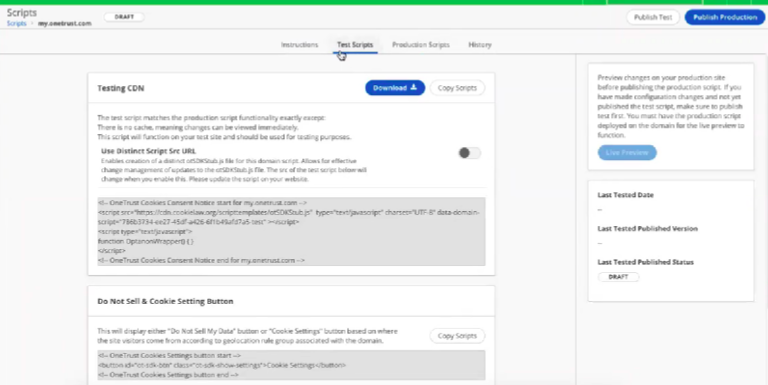
Step 5: Publish the scripts
After completing all the above steps, the last stage is to publish the scripts that have been generated as a result of the website scanning.
This is a snippet of code that can be used to implement the banner and the preference center on the website. There are mainly two types of scripts, Test and Production CDN. Both these scripts must be placed in the <head> section of the website. The scripts contain a unique identifier that is specific to each domain.
The Test Script is purely for testing purposes. This CDN helps to verify the banner behavior and style. The no-cache feature in this particular script helps in reflecting the changes immediately after republishing the script. Also, the test is appended along with the unique identifier in the script. The test scripts are integrated with any test website regardless of the subdomain or domain.
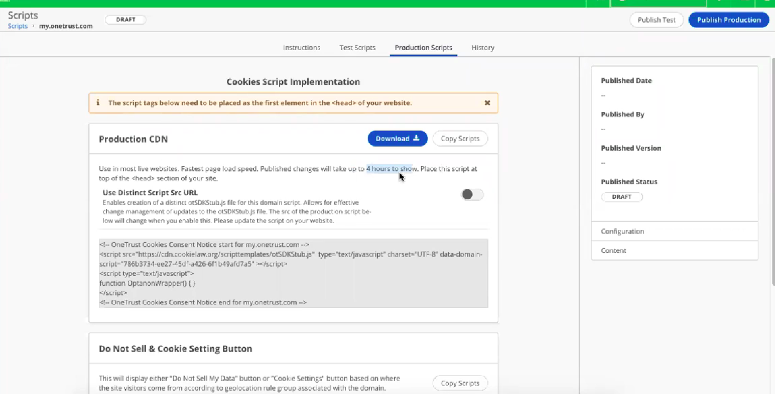
The Production script is the actual script used for the production site. These scripts can capture the consent of the users who interact with the banner. Unlike the test script, there is a delay in reflecting the changes after republishing the script.
The additional feature called 'Cache busters' in the production script configuration decreases the delay in reflecting the changes. Also, in addition to this, these scripts support the HTML tag attribute - lang, which helps in switching the languages based on the page, Also they support browser language settings as well.
Additional Features
Cookie list
OT supports the idea of having privacy page content differently. OT provides the user with a list of cookies that holds the data of cookies in the website in a detailed manner which can be integrated inside the website just by placing the div in the content area.
Cookie Button
OT gives the user to re-consent anywhere needed. Hence there is a Cookie button DIV, which upon selecting acts like a popup of preference center to opt-in or opt-out of the consent previously made by the user and save the changes.
The cookie button and cookie list divs will be available while publishing the scripts.
Preference center popup
By enabling this feature in the preference center, the user is given the privilege to reconsider the consent given to the website. After the banner is closed a small shield icon appears in the corner of the webpage. By clicking the icon the preference center pops open. The user can either opt-in or opt-out of the categorized cookies and save their consent.
Integration
The integration of the cookie script with Drupal is done by using the contributed module ‘Cookie Pro by OneTrust’. It provides us a field to paste the script directly and this module will alter the <head> tag and place the script inside the <head> tag of the page.
References
- https://www.cookiepro.com/knowledgebase/
- https://community.cookiepro.com/
- https://www.cookielawinfo.com/cookie-law/
Final Thoughts
Cookie consent is not just important because you need to comply with the law but it also helps build trust with your users. A sense of respect for end users' privacy is evident, thus improving your credibility as a brand. Many cases have been reported where websites do not offer the “Reject” cookies option or a way to close the banner/popup, thus forcing the end user to agree or leave the site. This goes against the new guidelines issued by the EDPB (European Data Protection Board) in May 2020 that mention that access to services/information must not be made conditional and that forcing the user to do so is not considered a valid consent.
If you liked this piece and would like to receive weekly updates on our latest articles, please consider subscribing to our newsletter.

Fathima Basheer
Related Insights


Don't Miss Out!


