Table of contents
- Why use Windows Subsystem for Linux?
- Let’s take one step at a time
- Step 1: Install WSL
- Step 2: Install Ubuntu bash
- Step 3: Set the login
- Step 4: Install PHP and its extensions
- Step 5: Install Composer
- Step 6: Install Apache
- Step 7: Enable PDO
- Step 8: Activate clean URL's
- Step 9: Install MySQL
- Step 10: Install Drupal 9
- How to Access and Edit files from WSL
- Final Thoughts
If you’re reading this, chances are you already know what Windows Subsystem for Linux is or maybe you’re already using it. But if you’re new to it, Windows Subsystem for Linux (WSL) is a Windows feature that lets you run a Linux distribution and use a BASH command line straight from your Windows machine!
Linux systems run Drupal very well. Read more to find out why use WSL after all, and a step-by-step guide on installing Drupal 9 on WSL from scratch.
Why use Windows Subsystem for Linux?
Some of the many reasons why a lot of developers like using WSL are:
- Supports better performance speed when working on Javascript-based frameworks.
- Instead of translating a tutorial written for Linux users into equivalent commands for Windows, you prefer using BASH.
- Better alignment between your local dev environment and the Linux deployment environment.
- You don’t need a separate virtual machine or dual booting.
- You don’t need to maintain both Links and Windows build scripts while you leverage Linux workspaces.
Let’s take one step at a time
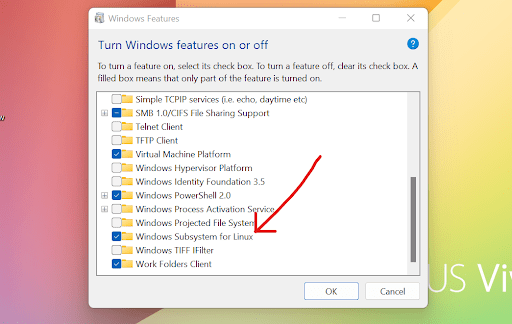
Step 1: Install WSL
Before installing WSL, we need to make sure that WSL is enabled in the Windows Features: “Turn windows feature on/off”, as shown in the screenshot below.
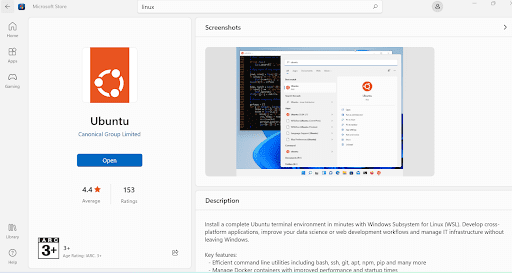
Step 2: Install Ubuntu bash
Go to the Microsoft store and look for Linux. Here, I am using the Ubuntu app. Install and open the Ubuntu bash.
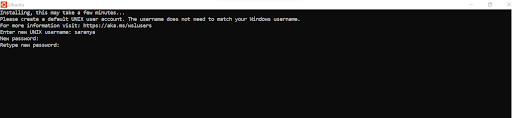
Step 3: Set the login
Now let’s open Ubuntu bash. When you initialize it, it will ask you to create a username and a password. You can choose your own username and password here.
Step 4: Install PHP and its extensions
Run the below commands to install PHP and the required extensions for Drupal.
$ sudo apt-get update
$ sudo apt-get install -y git php8.1 php8.1-curl php8.1-xml
php8.1-mbstring php8.1-gd php8.1-sqlite3 php8.1-mysql php8.1-cli
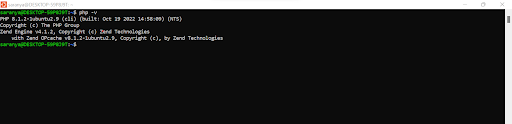
php-xml php8.1-gd libapache2-mod-php8.1 php8.1-mbstringNow run “php -v” to confirm if the installation has been done successfully.
Step 5: Install Composer
Use these commands to install composer on Ubuntu:
$ sudo php -r "copy('https://getcomposer.org/installer', 'composer-setup.php');"
$ sudo php -r "if (hash_file('sha384', 'composer-setup.php') === '55ce33d7678c5a611085589f1f3ddf8b3c52d662cd01d4ba75c0ee0459970c2200a51f492d557530c71c15d8dba01eae') { echo 'Installer verified'; } else { echo 'Installer corrupt'; unlink('composer-setup.php'); } echo PHP_EOL;"
$ sudo php composer-setup.php
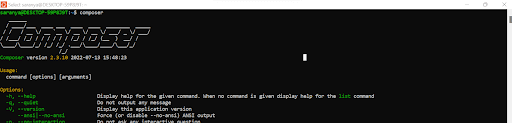
$ sudo php -r "unlink('composer-setup.php');"To make working with Composer easier, run the following command to move Composer into your global path:
$ sudo mv composer.phar /usr/local/bin/composerNext, type composer to make sure you installed it successfully.
Step 6: Install Apache
Follow the below commands to install Apache:
$ sudo apt update && sudo apt -y upgrade
$ sudo apt install -y apache2
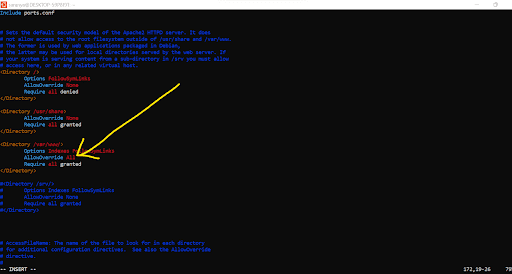
$ sudo service apache2 restartIf you have wamp or xampp on your Windows machine, make sure you change the port number from Listen 80 to Listen 8080 in this file (/etc/apache2/ports.conf).
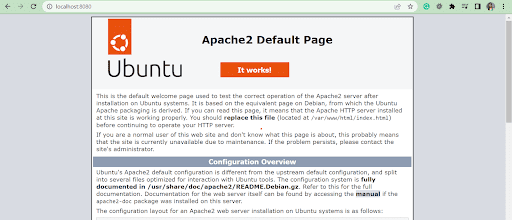
Now go to http://localhost (or) http://localhost:8080 on your browser and make sure Apache is installed successfully.
Step 7: Enable PDO
Next, you have to enable PDO (PHP Data Objects) support. Please follow the below commands:
$ sudo apt-get install php8.1-mysql- Go to /etc/php/8.1/apache2/php.ini file and uncomment "extension=pdo_mysql.so" line.
- Restart Apache.
$ sudo service apache2 restartStep 8: Activate clean URL's
To activate clean URL’s, use this command:
$ sudo a2enmod rewriteGo to /etc/apache2/apache2.conf file, edit as "Allowoverride All" for /var/www/ directory, and restart apache.
Step 9: Install MySQL
Next, you have to install MySQL server.
$ sudo apt install -y mysql-server mysql-client
Now Start MySQL
$ sudo service mysql start
Navigate to MySQL
$ sudo mysql
Alter root user password.
$ ALTER USER 'root'@'localhost' IDENTIFIED WITH mysql_native_password BY '*********';
After you altered the password, you have to log in to MySQL by running the following:
$ sudo mysql -u root -p
Give password and login to the MySQL server.
Next, run the below command to improve the security of your DB.
$ sudo mysql_secure_installation
Provide values as you wish for each question. Make sure, you gave “No” for “Disallow root login remotely?”
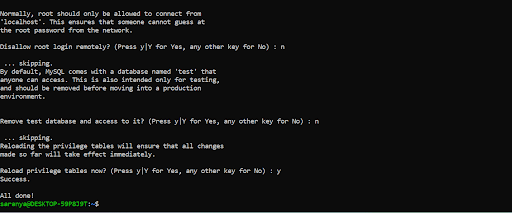
Now go to your MySQL and flush the privileges. Restart MySQL.
$ FLUSH PRIVILEGES;
Step 10: Install Drupal 9
Navigate to the /var/www/html directory and download the latest version of Drupal 9 with Composer.
$ composer create-project drupal/recommended-project drupal-9.4.9
Now lets update the Drupal folder permissions for Apache:
$ sudo chown -R www-data:www-data /var/www/html/drupal-9.4.9
$ sudo chmod -R 755 /var/www/html/drupal-9.4.9
- To make sure the installation is perfect, its a good idea to restart the system once before installing Drupal.
- Create a new database for the Drupal installation.
- Go to http://localhost:8080/drupal-9.4.9/ and proceed with the Drupal installation.
- When you give data for the database form, make sure you gave a password for MySQL authentication.
How to Access and Edit files from WSL
Now that you have set up WSL and installed Drupal 9, lets look at accessing your files from WSL.
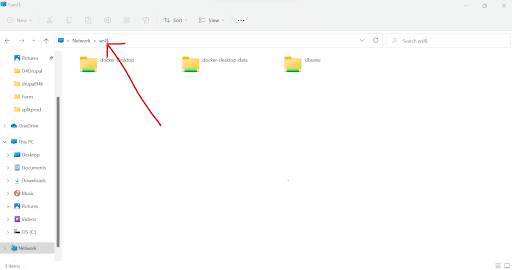
Go to your File Explorer and type \\wsl$ to navigate to your WSL folder. The Ubuntu folder is your WSL folder (as shown below).
Now let's edit the WSL files
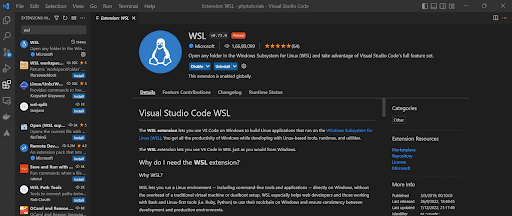
Open Visual Studio code and download the WSL extension.
On Ubuntu bash, go to the Drupal folder and type $ code
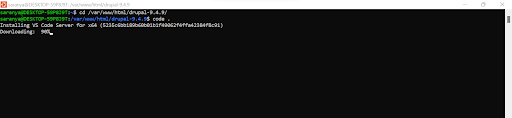
It will now open the folder on Visual Studio Code (a Microsoft source-code editor).

Now, enable the edit permission:
$ sudo chown -Rv saranya drupal-9.4.8
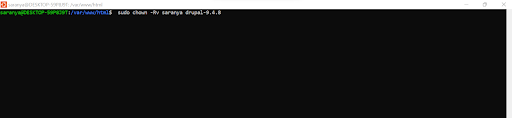
And that’s it! As a result, whatever you update in VS Code will affect your website as well.
Final Thoughts
I hope you liked what you learned today and maybe you will try installing Drupal 9 on WSL yourself sometime! Consider subscribing to our weekly newsletter to receive our latest updates on Drupal and other trending tech topics. If you’re new to our site, Specbee is a leading Drupal development company and we offer a full stack of expert-led Drupal services. Looking to start a new Drupal project? We’d love to talk!

Saranya Ashok Kumar
Related Insights
Don't Miss Out!


