Now there are two types of people in the sandwich universe - people who like to order a sandwich off the menu and people who like to customize their sandwich by choosing their bread, filling, and sauce. We’d like to call the latter, ‘Sandwich Mavericks’, who would (most likely) prefer their websites to be as unique as their custom sandwiches. They’re not tied down to a specific front-end technology, or limited by templates and themes provided by the CMS. A Decoupled Drupal CMS architecture lets you be the architect of your web destiny.
If you’re not craving a sandwich yet, jump into this article right away to learn more about Decoupled Drupal and using React as the front-end technology to craft absolutely delicious web experiences that your audience will love.

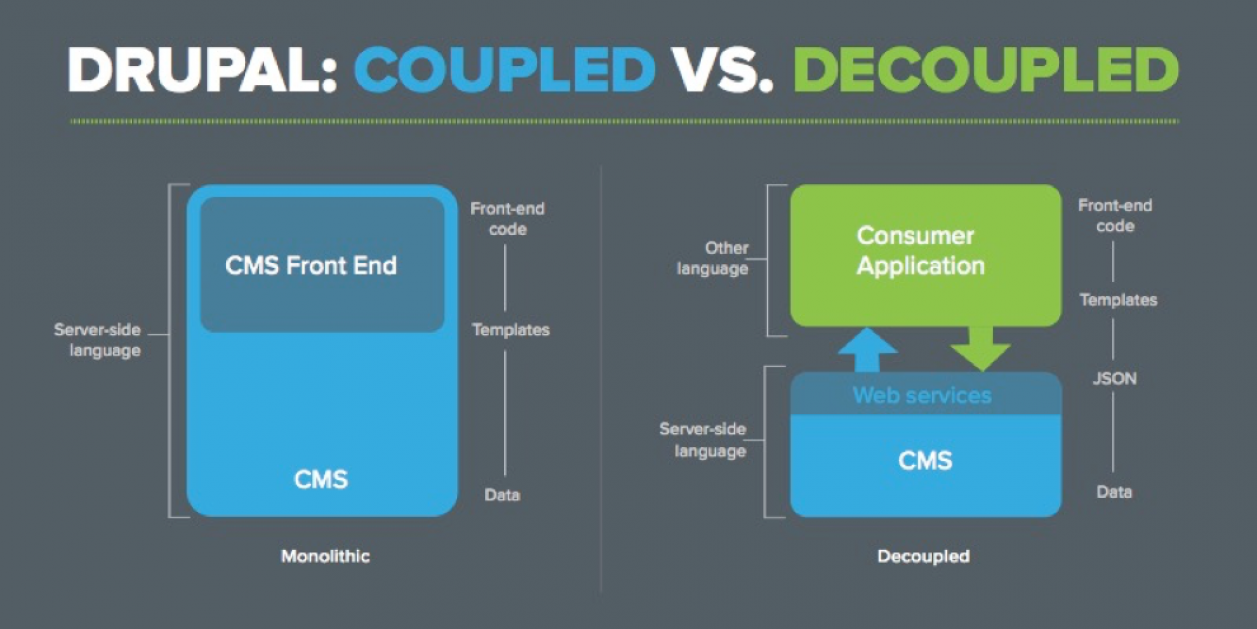
What is Decoupled Drupal?
The term decoupled means to be detached or separated. In terms of Drupal, it refers to a detached frontend from the Drupal architecture. Hence in a decoupled Drupal architecture, the contents are managed by Drupal and the frontend can be any frontend technology like React, AngularJS, VueJS, etc.
Decoupled Drupal is also known as headless Drupal.
Traditional CMS VS Decoupled CMS
Some key differences between traditional Drupal and decoupled Drupal:
- Traditional Drupal uses Twig as the frontend tool, while decoupled Drupal can use any of the previously mentioned modern frontend technologies.
- Traditional Drupal provides us with many out-of-the-box features like content preview, layout builder, etc. In decoupled Drupal, it will need extra effort to build these features.
- Traditional Drupal has average page speeds, whereas decoupled Drupal has average to fast page speeds.
- Traditional Drupal uses monolithic architecture, while decoupled Drupal can use both monolithic & microservices architecture.
- Tech complexity is average in traditional Drupal, whereas in decoupled Drupal it is highly complex.
Should you consider decoupling Drupal?
Choosing between the two isn't a straightforward decision. It depends on various factors, with a key one being that decoupled Drupal is more intricate and requires additional effort to replicate many features that come prepackaged with Drupal. This can lead to increased development costs and heightened technical complexity.
However, it also allows you to seamlessly incorporate Drupal into various modern technologies such as single-page applications (SPAs), mobile apps, configuration-based user interfaces, IoT and offers reusable content capabilities.
How does Drupal support headless
As Drupal employs an API-first architecture, we can utilize its backend structure to store and deliver content through APIs. Drupal's core natively supports JSON:API/REST API, enabling us to present content as JSON and communicate with front-end technologies via REST.
To know which one to choose: JSON API vs REST API vs Graph QL, you can refer to this article.
Creating a decoupled Drupal with React
Let’s get down to business and start building a decoupled Drupal project with React.
This is what your Project folder structure will look like:
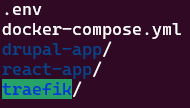
Under the root directory, we are placing our Drupal project and React app.
Sidenote: here docker-compose.yml is for managing the docker container created for Drupal and the React app.
Our Drupal project is created using:
composer create-project drupal/recommended-project my_site_nameAnd our React app is created with:
npx create-react-app my-appSetting Up the Drupal application
Step 1: On the Drupal side we need to configure a few things to get started:
a) Enable CORs settings in services.yml
# Configure Cross-Site HTTP requests (CORS).
 # Read https://developer.mozilla.org/en-US/docs/Web/HTTP/Access_control_CORS
 # for more information about the topic in general.
 # Note: By default the configuration is disabled.
 cors.config:
   enabled: true
   # Specify allowed headers, like 'x-allowed-header'.
   allowedHeaders: ['*']
   # Specify allowed request methods, specify ['*'] to allow all possible ones.
   allowedMethods: ['*']
   # Configure requests allowed from specific origins. Do not include trailing
   # slashes with URLs.
   allowedOrigins: ['*']
   # Sets the Access-Control-Expose-Headers header.
   exposedHeaders: false
   # Sets the Access-Control-Max-Age header.
   maxAge: false
   # Sets the Access-Control-Allow-Credentials header.
   supportsCredentials: true
b) Enable Rest, Rest UI, Serialization modules
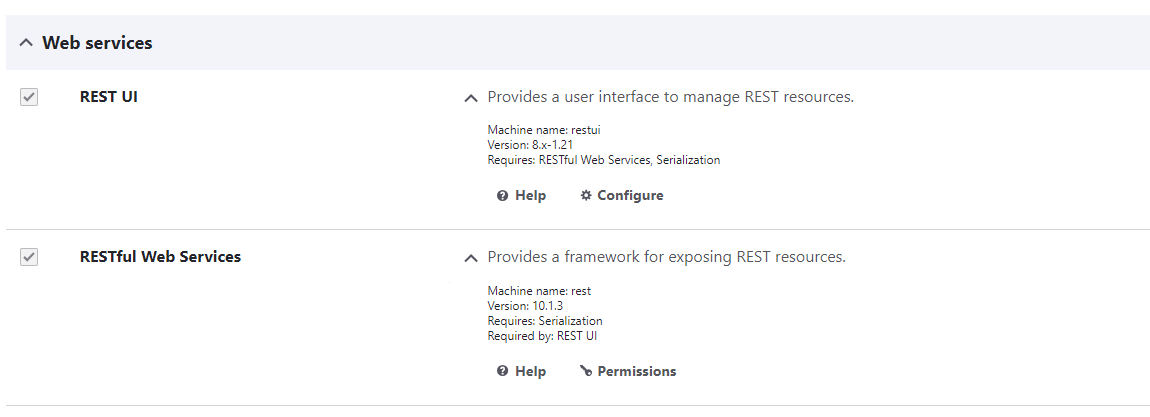
By default, Restful Web Services & serialization modules are present out of the box in Drupal 9. You need to install Rest UI (which is a contrib module).
composer require 'drupal/restui:^1.21'c) Click the configure settings on the Rest UI module. Then enable the “Content” Resource name.
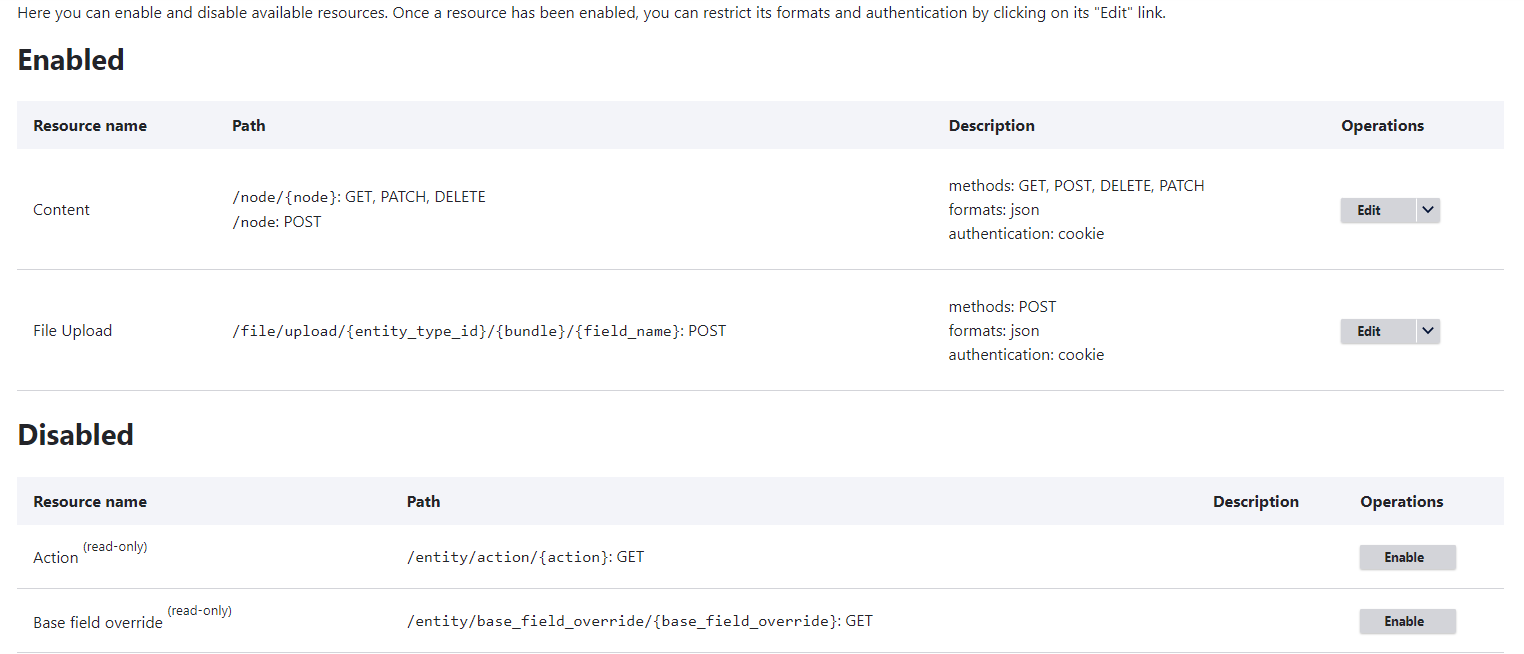
When this is enabled, it converts the data received from Drupal into JSON.
Step 2: In order to access it, go to any content page, like here we are opening an article page.
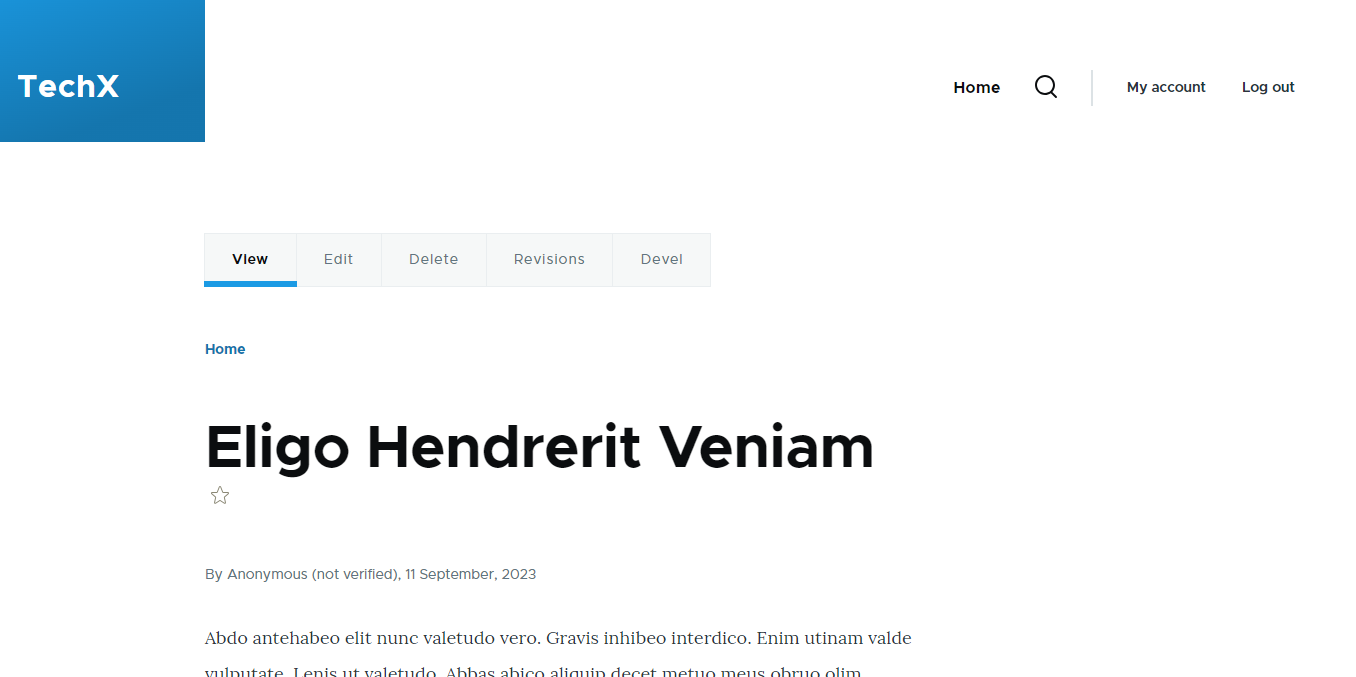
Now if you add ?_format=json query parameter, it will show the data in JSON format ( a feature of RESTful Web services).
Step 3: Now let's create a view with the latest articles on Drupal (see screenshot)
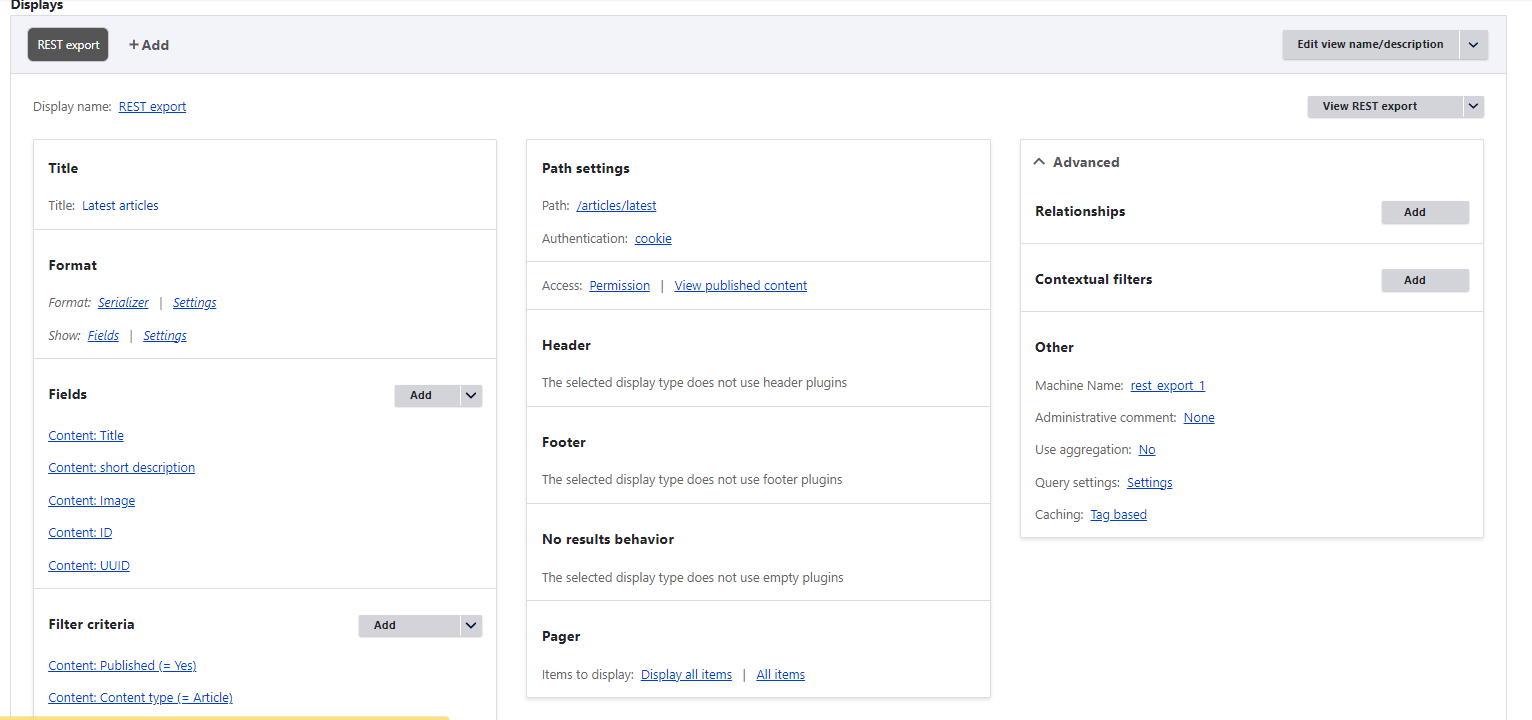
A few pointers on the creation of the view.
a) Create a “rest export” view. This will be used for passing out our latest articles data to our React app.
b) Under path settings, authentication is provided as a “cookie”. We can also use basic auth (i.e. verification with username/password). For that, you need to install the basic auth module. For this demo, we are only using cookie-based authentication since it is more user-friendly when working with mobile applications.
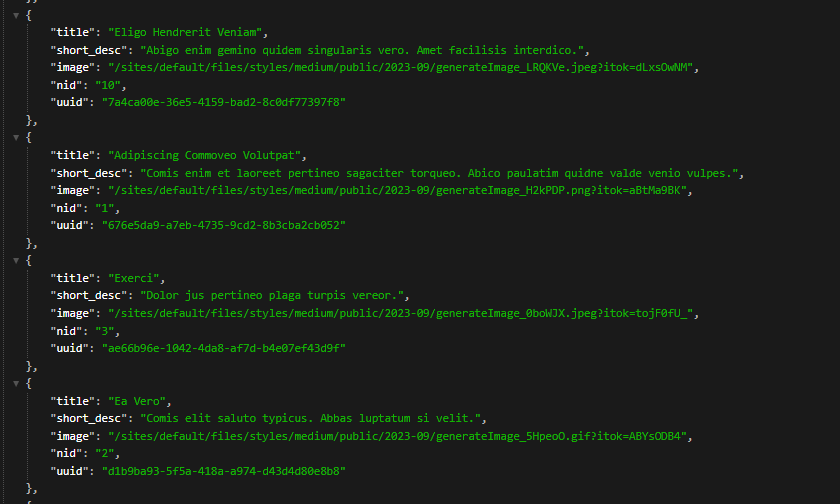
Step 4: Once created, visit the view url (here: /articles/latest). You will see the data formatted into JSON.
Note: You don't need the _format=json parameter for this view page.
Setting Up the Frontend Application (React)
Now that we have set up our Drupal site, let's begin creating out React application.

1) Folder structure
Since we are using create-react-app, it provides us with the boilerplate code to get started with react.
Sidenote: It is better to use Vite than Create-react-app for improved performance.

2) Create the frontend scaffolding
<div className="App">
       <header className="App-header">
         <h1 className='header mb-4'>React APP</h1>
         <div className="btn-wrapper">
           <div><button className="btn" onClick={() => {setIsModalOpen(true)}}>Add Nodes</button></div>
         </div>
       </header>
       <Results articleUpdated={articleUpdated} setArticleUpdated={setArticleUpdated}/>
     </div>
     <div className={clsx("modal", isModalOpen && 'show')} id="#addForm">
         <button className='close-btn' onClick={() => {setIsModalOpen(false)}}>X</button>
         <div className="modal-header"></div>
         <div className="modal-body">
           <form className="modal-form" onSubmit={handleAddSubmit}>
             <div className="field_item">
               <label htmlFor="title">Title</label>
               <input typeof='text' name='title' id="title" onChange={(e) => setFormData({...formData, title: e.target.value})} value={formData.title}/>
             </div>
             <div className="field_item">
               <label htmlFor="title">Short Description</label>
               <input typeof='text' name='short_desc' id="short_desc" onChange={(e) => setFormData({...formData, shortDesc: e.target.value})} value={formData.shortDesc}/>
             </div>
             <div className="field_item">
               <label htmlFor='body-field'>Body</label>
               <textarea rows="5" cols="33" name='body' id="body-field" onChange={(e) => setFormData({...formData, body: e.target.value})} value={formData.body}></textarea>
             </div>

             <input type="submit" className="btn"/>
           </form>
         </div>
     </div>
If the structure feels overwhelming, worry not.
There are mainly two components:
- Results - renders the result from the API call.
- Article - the article items on the listing.
Results.js
const Results = ({articleUpdated, setArticleUpdated}) => {
 // article listing state.
 const [articleList, setArticleList] = useState([]);
 useEffect(()=>{
   const relative_path = "/articles/latest";
   // adding intensional delay for UI.
   setTimeout(() => {
     getData(relative_path)
     .then(res => setArticleList(res))
     .catch((error) => {console.log(error)})
   }, 1000);
 },[JSON.stringify(articleList), articleUpdated]);
 return (
   <div className="results-wrapper">
     {
       articleList?.length === 0 ? <Loader/> :
       <div className="article-lists">
         {
           articleList?.map((curr,index) => {
             return (
               <Article key={curr.uuid} title={curr.title} shortdesc={curr.short_desc} nid={curr.nid} ds={index*10+"ms"} articleUpdated={articleUpdated} setArticleUpdated={setArticleUpdated}/>
             )
           })
         }
       </div>
     }
   </div>
 )
}
export default Results;
Article.js
// article item component.
const Article = ({title,shortdesc,nid, ds, articleUpdated, setArticleUpdated}) => {
 const handleDelete = (nid) => {
   deleteData(nid)
   .then((response) => {
     if (response.ok) {
       setArticleUpdated(articleUpdated + 1)
     }
   })
   .catch((error) => console.error(error))
 }
 return (
   <div className="article-item" style={{"--ds-delay": ds }}>

     <div className="article-item--body">
       <h3>{title}</h3>
       <p>{shortdesc}</p>
       <button className="delete-btn" onClick={() => {handleDelete(nid)}}>Delete</button>
     </div>
   </div>
 )
}
The Results component uses getData() and postData() to get/post data from Drupal.
getData()
export async function getData(relative_path, query_params) {
 const hasQuery = query_params ? "?" + query_params : "";
 const generated_URL = endpointUrl + relative_path + hasQuery;
 try {
   const res = await fetch(generated_URL);
   const get_response = await res.json();
   return get_response;
 } catch(error) {
   console.error(error)
 }
}
postData()
export async function postData(data_to_post) {
 try {
   const response = await fetch(tokenURL)
   const csrf_token = await response.text()
   const post_data = {
     "type": [{
       "target_id": 'article',
     }],
     "title": [{
       "value": data_to_post.title,
     }],
     "body": [{
       "value": data_to_post.body,
     }],
   };
   const generated_URL = endpointUrl + "/node?_format=json";
   const post_response = await fetch(generated_URL, {
     method: "POST",
     headers: {
       "Content-Type": "application/json",
       "X-CSRF-Token": csrf_token,
     },
     body: JSON.stringify(post_data),
     credentials: "include"
   })
   return post_response;
 } catch(error) {
   console.log(error);
 }
}
State variables used
const [formData, setFormData] = useState({
   title: "",
   shortDesc: "",
   body: "",
   img_field: "",
 });
 const [articleUpdated,setArticleUpdated] = useState(0);
Form handler
const handleAddSubmit = (event) => {
   event.preventDefault();
   postData(formData).then((res) => {
     if(res?.ok){
       setArticleUpdated(articleUpdated+1)
     }else {
       console.log('invalid form submission')
     }
   })
   setIsModalOpen(false);
 }
3) After adding all the React code and the CSS as per desired design (Note: CSS code is not included), Run npm start
This will start your React application.
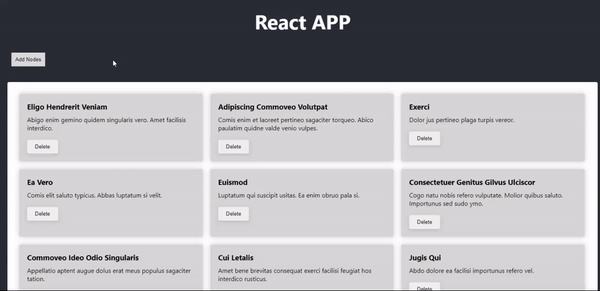
Now you can add data on the React app and it will get stored on Drupal. And via the get method, we can view the updated result on our React app.
This is the final result:
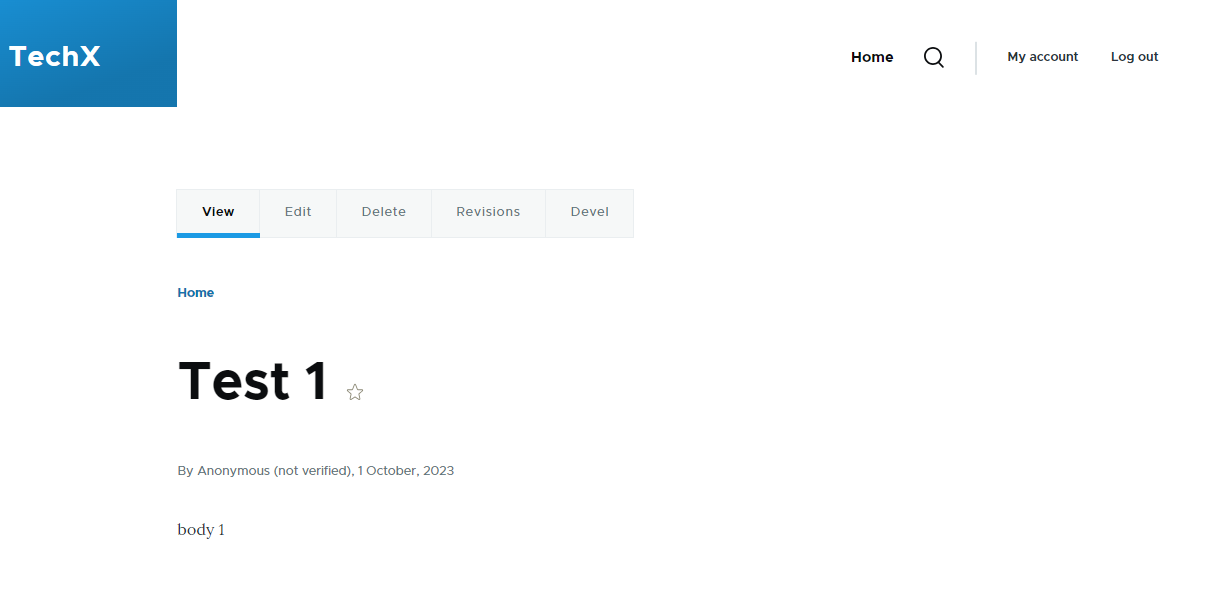
On the Drupal application, our test data is now stored.
Final Thoughts
In the current market trend for API-first architecture, the rise of modern frontend tools to better serve the customer, and the possibility to use Drupal capabilities along with other powerful architectures, the Headless/Decoupled Drupal is a step into that. Currently, the poor documentation for decoupled architecture using best practices and the complexities of extracting data from some commonly used Drupal features like layout builder, paragraph module, etc. make it challenging to implement a fully decoupled website. As Dries Buytaert (founder of Drupal) also suggests going with progressively decoupled is a better choice as of now.
The decision to opt for decoupled architecture comes with both advantages and challenges, it’s a matter of which one weighs more as per the end product. Discover how Specbee can assist you in navigating these waters and building a tailored solution that meets your unique needs.

Kaustab
Related Insights


Don't Miss Out!


