
How to integrate Auth0 Single Sign-On (SSO) in Drupal

If you want to offer your users a hassle-free login experience, convenience and security, Single Sign-On (SSO) is the way to go. SSO is an authentication process that allows users to access multiple applications or services with a single set of login credentials.
Auth0 is an identity-as-a-service (IDaaS) platform that provides authentication and authorization services for applications and APIs. It offers a comprehensive set of features for implementing secure and customizable authentication solutions, including support for various authentication methods such as username/password, social logins, and multi-factor authentication (MFA).
In this article, you will learn more about SSO and Auth0 and how you can integrate it with your Drupal website.

Benefits of SSO Integration in Drupal
Seamless User Experience: Integrating SSO into Drupal enables users to log in once and access all connected applications seamlessly, eliminating the need for multiple logins and enhancing user convenience.
Centralized User Management: SSO centralizes user authentication and authorization, making it easier for administrators to manage user accounts, permissions, and access control policies across multiple Drupal sites or integrated applications.
Enhanced Security: SSO enhances security by enforcing consistent authentication policies and enabling centralized management of user access, reducing the risk of security breaches due to weak passwords or unauthorized access.
Reduced Development Efforts: By leveraging Auth0's SSO capabilities, developers can significantly reduce the time and effort required to implement authentication and authorization features in Drupal applications, accelerating the development process and time-to-market for new features and functionalities.
Take a look at this article where we discussed integration of SSO with Drupal using SAML
Steps to Integrate Auth0 SSO in Drupal
Prerequisites
- Auth0 account
- SAML SP 2.0 Single Sign On (SSO) - SAML Service Provider
Auth0 configuration
- Register to Auth0.
- Go to https://manage.auth0.com/ and log in.
- Create the tenant. To create a tenant, click on the drop-down near the logo in the top left corner.
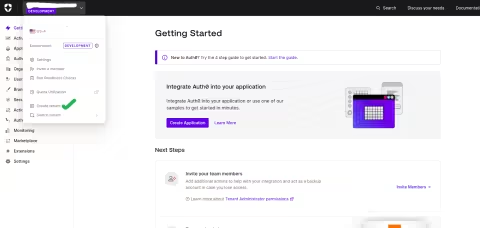
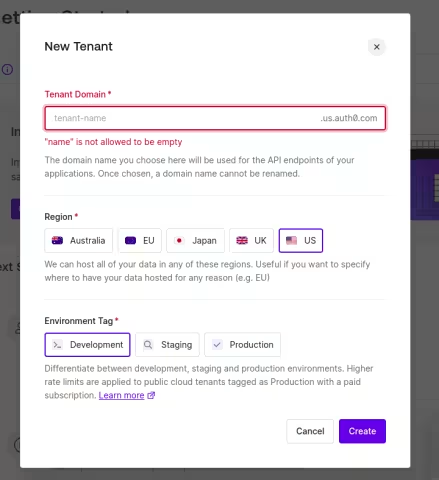
- You will see a pop-up fill the required information in that pop-up like tenant name, region, and environment. Click on the Create button.
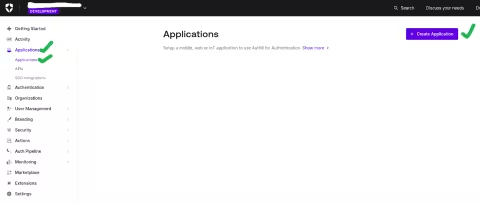
- Next, click on the "Applications" option in the left menu. A list will open. Then click on “Applications” on that list and you will see an application page. Click on the “Create Application” button.
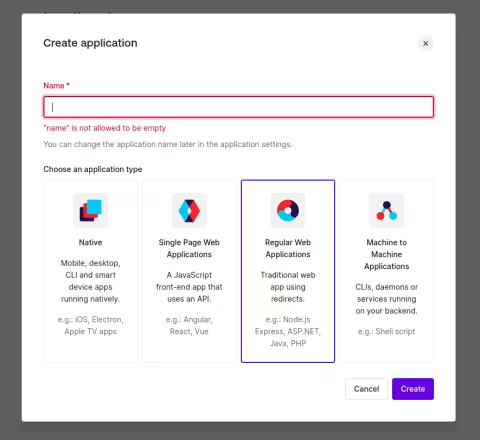
- You will see a pop-up, enter the application name in that pop-up and select “Regular Web Application” then click on Create.
- Next, click on that application and go to the settings tab.
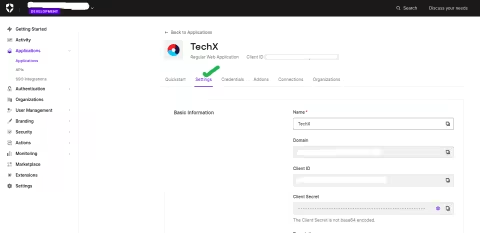
- In the Settings tab, you can update the application logo if you want.
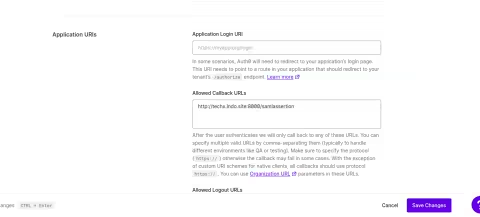
- In the Settings tab, add the callback URL "[Domain]/samlassertion" to the "Allowed Callback URLs" field and then click Save.
- Then go to the “Addons Tab”.
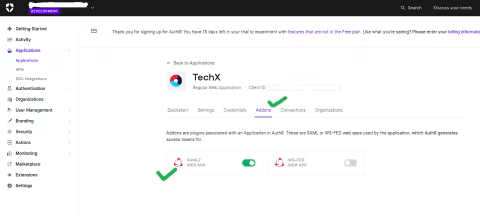
- In the Addons tab, click on the "SAML2 Web App" option.
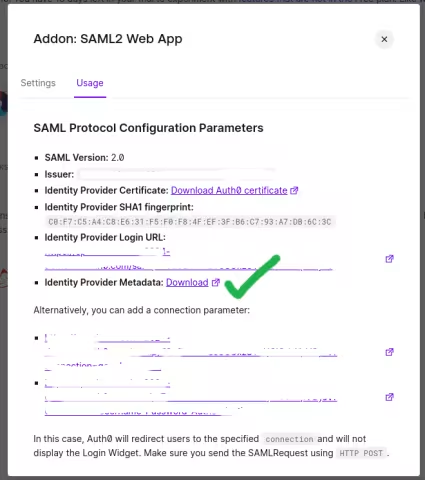
- You will see a pop-up with two (Settings and Usage) tabs.
- In the Settings tab, add the callback URL "[Domain]/samlassertion" and click the Enable button.
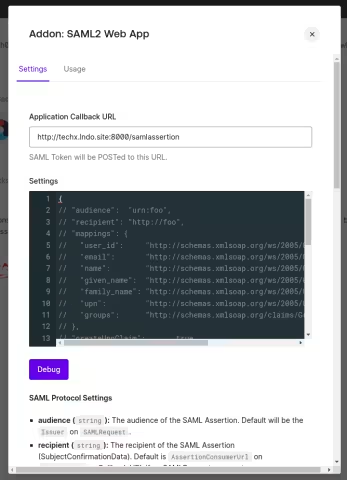
- After this go to the Usage tab.
- In the Usage tab, click on the "Download" button of "Identity Provider Metadata".
Drupal application configuration
- Install the "SAML SP 2.0 Single Sign On (SSO) - SAML Service Provider" contrib module “https://www.drupal.org/project/miniorange_saml” in your Drupal application using composer.
composer require 'drupal/miniorange_saml:^3.0' - Go to the Drupal website and log in as administrator.
- Go to "Configuration" and then click on "MiniOrange SAML Login Configuration".
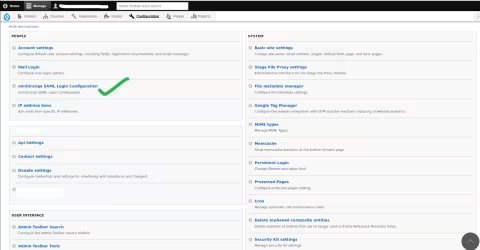
- Go to the “Service Provider Setup” tab
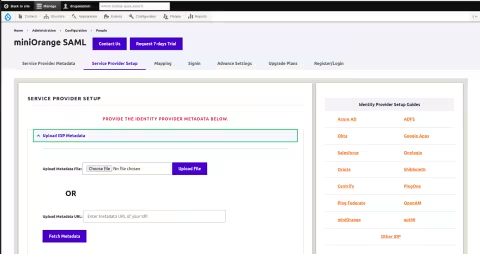
- Click "Add New IDP".
- Upload the metadata file that we downloaded from Auth0.
- Click on the save button.
Steps to add role mapping
- Go to “Configuration” then click on "miniOrange SAML Login Configuration".
- Go to the “MAPPING” tab
- Click on the “Enable Role Mapping” option (If not enabled already).
- Select the “Library” role from the dropdown.
- Click on the “Save Configuration”.
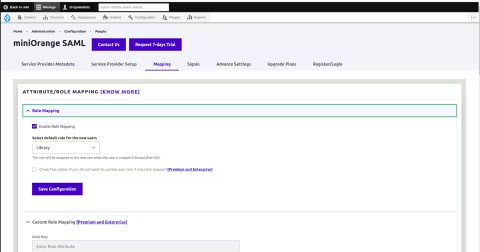
Then clear the cache and visit the login page.
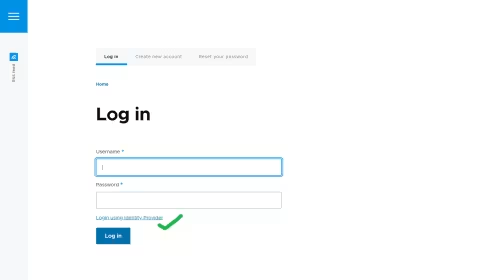
You will see an SSO login link above the submit button. Click on that link.
You will be redirected to the auth0 login page
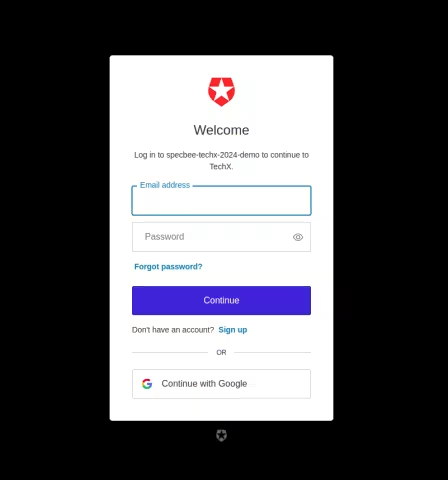
If you have an Auth0 account then enter the username and password otherwise you can create an account using the signup link. After login you will be redirected to your Drupal application and your account will be logged in.
Final thoughts
The demand for seamless user experiences and robust security measures continues to escalate by the day. By integrating Auth0's Single Sign-On solution with your Drupal site, you're not just staying ahead of the curve — you're shaping the future of online interaction. But the journey doesn't end with integration. The next step is optimization. Continuously refine your authentication workflows, leverage Auth0's advanced features to customize user experiences, and stay vigilant against emerging threats. Reach out to our Drupal development team to enhance your user experience with features like these.
Last updated on July 31, 2026
About the author
Yogesh Sevak
Meet Yogesh Sevak, Senior Drupal Developer at Specbee. Yogesh is a travel enthusiast and loves to explore new places. One of his favorite travel destinations is Vrindavan. And when he’s not busy writing code, he likes to go on long drives and embrace the wind.

Getting started with Drupal Canvas: A frontend developer's first look
Wondering why Drupal needs another page builder? Here's what I learned installing Drupal Canvas, exposing my SDCs, and writing React right in the browser.
12 min read


Canvas Page Metatag Module: How to restore full SEO controls to Drupal Canvas pages
Drupal Canvas hides most Metatag fields behind one SEO title box. Check out how Canvas Page Metatag restores them and fixes a Robots checkbox bug.
11 min read


Specbee is now a Drupal AI Initiative Partner. What does it mean for your platform?
Specbee has joined the Drupal AI Initiative as a Certified Partner. See what Drupal AI initiative is about, how it's governed, and what it means for your enterprise site.
5 min read