Disclaimer: Zero coding involved!
Yes, you heard it right! It’s because we’re talking about implementing the Drupal Feeds module, where you don’t need to code to import and manage data!
The Feeds module in Drupal simplifies data import into nodes, users, taxonomy terms, and more via a user-friendly web interface. No coding required! It handles various formats like CSV, JSON, XML, and RSS feeds. Dive into this article to get started with installing and implementing the Feeds module for data imports.
Why use the Drupal Feeds Module
When stacked up against other migration modules like Migrate, which is a part of Drupal 10's core, here's what sets Feeds apart:
- All imports are created from Drupal's UI. Say goodbye to coding and hello to user-friendly imports!
- Provides different ways of importing source data, whether it's from local files, directories, or URLs. Your data, your choice!
- All your imports can be handled directly from your website's UI. No need to change any configurations.
- Allows you to schedule imports so your data is always up-to-date.
- You’re not restricted to just a single data source.
Installing the Feeds module
Like any other contributed Drupal module, you can install the Feeds module with the Composer command: composer require 'drupal/feeds'. (okay maybe just this one line of code :)
Once it is downloaded, enable it with the drush command or by visiting the Drupal admin dashboard.
Configuring the Import Feed
To configure the module, navigate to admin > structure > feed types > Add Feed Type.
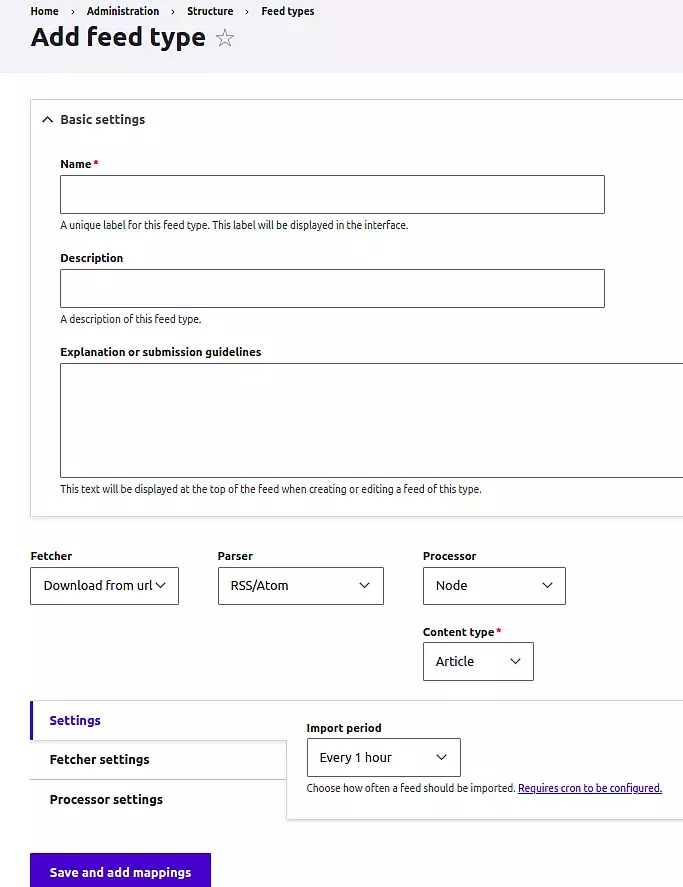
To begin importing data, provide the name and a description of the importer, this indicates the importer's use.
Below are the 3 Importers options:
Fetcher
This option indicates the source for importing data. You have 3 different options here:
- Download: Import data via a URL.
- Upload: Data will be imported via a file upload.
- Directory: This option lets you select files that will be found in the system folder of our Drupal file system.
After selecting the Fetcher option, you can configure the import settings within the Fetcher settings tab.
Parser
The parser is responsible for handling the source data's format. It offers a range of format choices for your imported data, including RSS/ATOM, CSV, and XML. If you need JSON format support, you can install the Feeds Extensible parser module.
Once you've selected your preferred format, you can fine-tune the settings within the Parser settings tab.
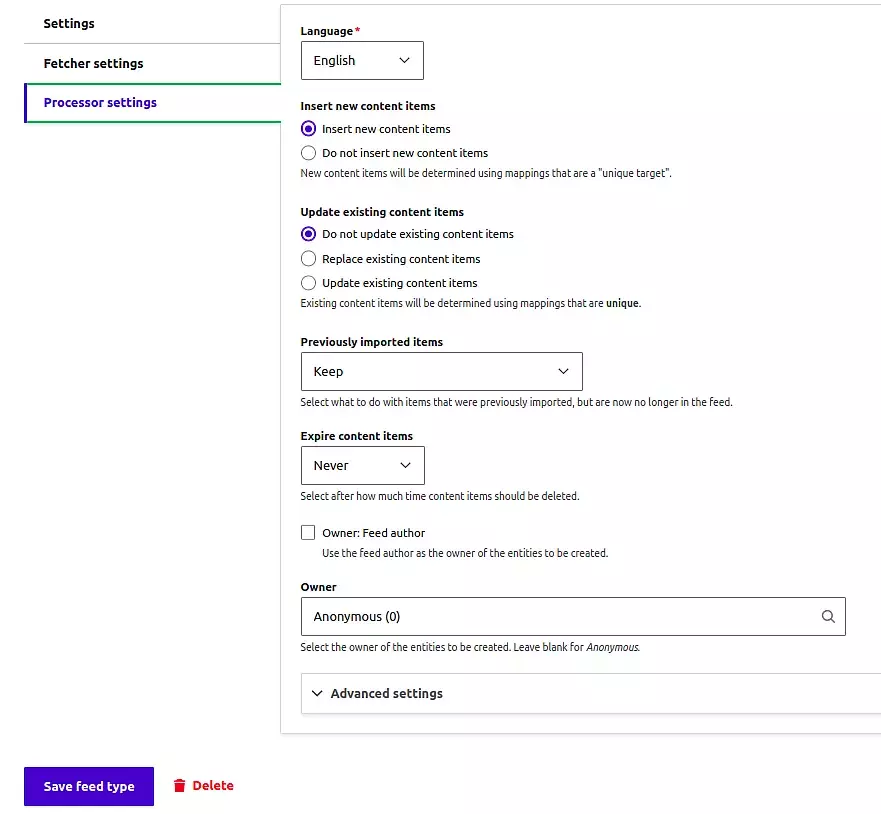
Processor
The job of the processor is to create the appropriate content in Drupal using the data you’ve received. This can include various content types such as nodes, users, taxonomy terms, files, URL aliases, and more.
The processor is configured in the Processor settings tab.
Here are some important configurations:
- Update existing content items
- Previously imported items
- Insert new content items
- Language
- Owner
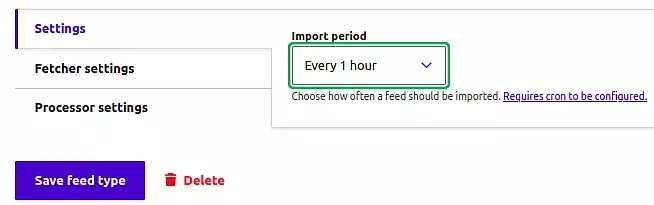
Settings
Under the settings tab, you can schedule the import period.
Adding Fields to the Feed Type
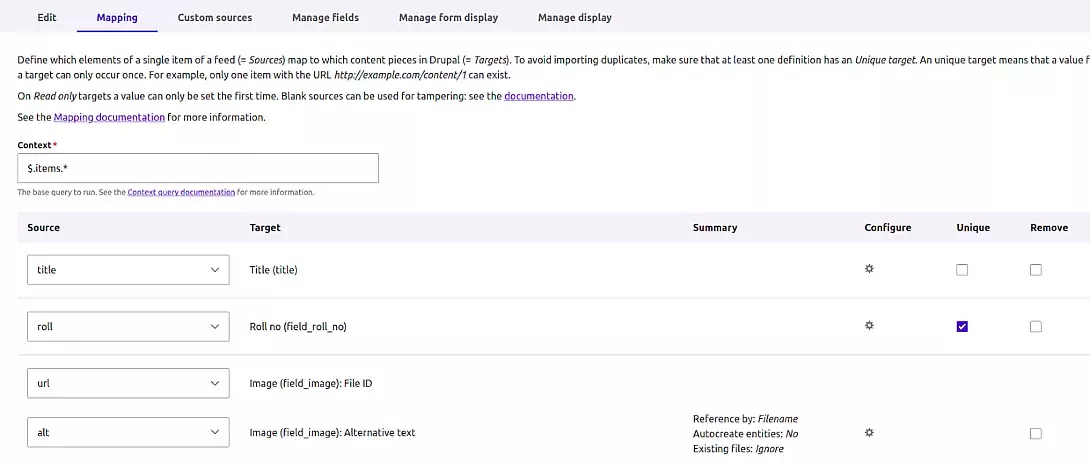
Define which elements of a single item of a feed (Sources) map to which content pieces in Drupal (Targets). To avoid importing duplicate values, make sure that at least one definition has a Unique option checked.
Here is an example of adding fields from a JSON file:
To add, click on the Mapping tab.
Add context as [ ] key defined in the JSON file as $.array_name.*
To add a field, click on Select a target option under the Target tab.
Now, let's add a Title.
To add the title field click:
- Select a target selector
- Choose the title field
- Click Select a source selector
- Choose a New JSON source
- Provide the exact key name and save.
Once the Import feed Type is created, you can find it under admin >structure > Feed Types (/admin/structure/feeds).
Importing Data
With the configuration in place, it's time to initiate the data import using the Feed type you've created.
- Navigate to Content > Feeds.
- Click on +Add feed.
- After clicking on Add Feed, you will see a list of configured feeds. Select the appropriate feed type to import data.
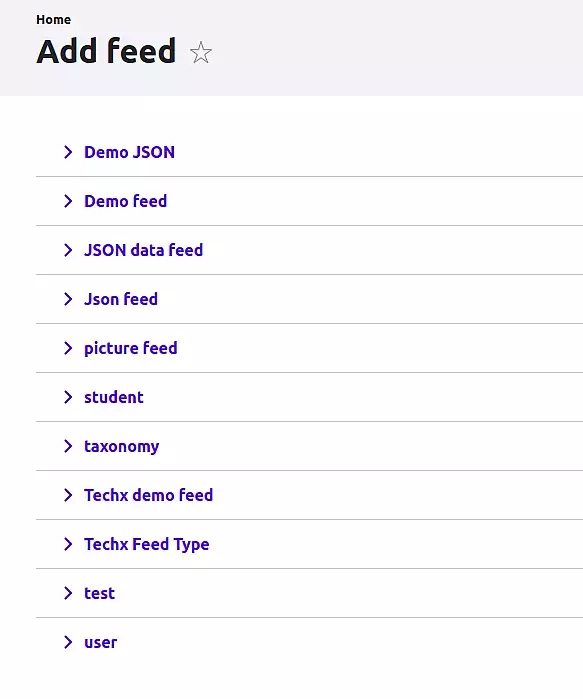
- Select the feed to import data.
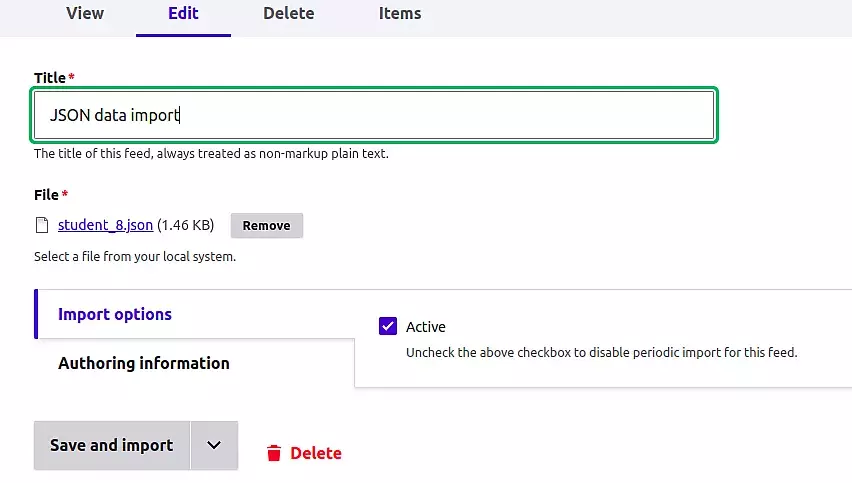
To begin the import, provide the title value, select a file for the import, and click on Save and Import.
After a successful import, the content will be created for the specific processor.
And that, my friends, is your ticket to smoothly importing data into our Drupal website using the versatile Drupal Feeds module.
Final Thoughts
In this blog, we've explored the key features and steps to implement the Drupal Feeds module, making data import and management a breeze. With its user-friendly interface, support for various data formats, and the ability to schedule imports, the Feeds module empowers you to keep your website's content fresh and dynamic without the need for extensive coding. Looking for a more detailed article on the Drupal Feeds module with examples and module extensions? Click here to read now.
Ready to leverage the power of Drupal for your website? Take advantage of our expert-driven Drupal development services and transform your website today. Don't wait, let's get started!

Chaitanya R Dessai
Related Insights


Don't Miss Out!


