When the Association of National Advertisers (ANA) names “Personalization” the “marketing word of the year”, you can probably feel comfortable that it is a strategy that’s here to stay. Personalized content adds a human touch to the customer experience, something that is priceless throughout their journey. This is proven by stats that suggest 90% of consumers find personalized content more appealing and get annoyed when it is not.
Marketing automation software giant, Marketo, helps B2B and B2C organizations engage and nurture potential leads while enabling marketers to create personalized marketing campaigns around them.
Combining the power of Marketo with a content management system like Drupal is one of the best ways to present a completely seamless digital experience to customers.
With Drupal - Marketo integration modules like the Marketo MA, you can automate lead capturing, tracking, nurturing, personalization, analytics, and much more. Now your Drupal website is also connected to different third-party services that will often need updated lead data from Marketo. Enter, Webhooks. In one of our recent projects, we used Webhooks to get real-time data from Marketo so that the content can be more personalized to the customer when they log in. Read more to find out about the Drupal - Marketo integration and how to configure a Webhook to synchronize Marketo data with Drupal in real-time.
Setting up Marketo in Drupal
Before moving on with setting up the Drupal - Marketo integration, note that this process assumes that you already have set up your Marketo account and you know how the platform works.
Installing the Marketo MA Drupal Module
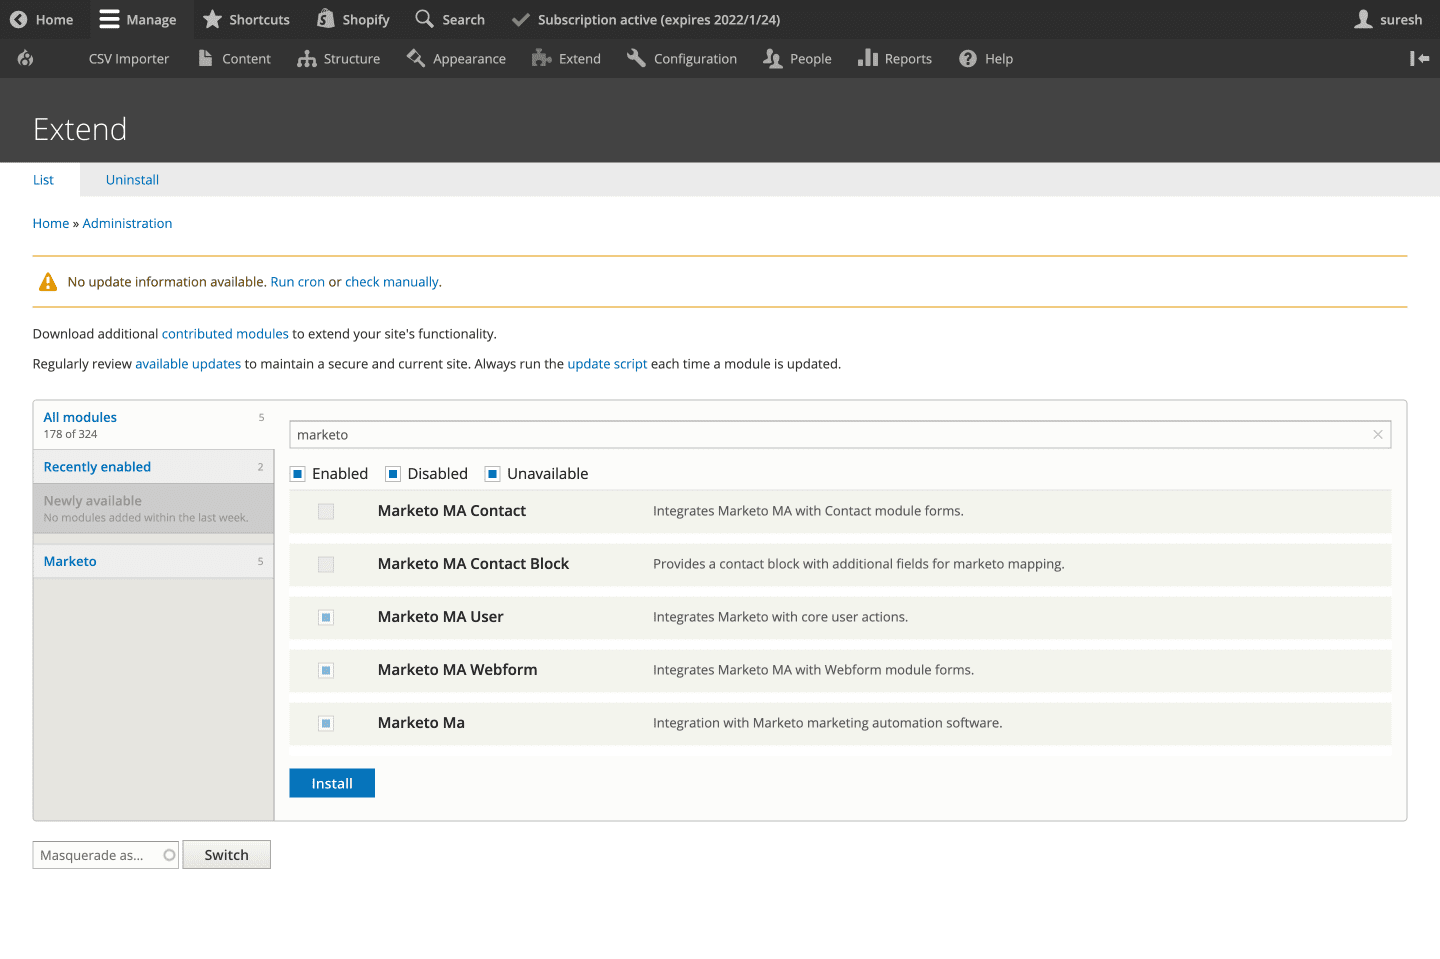
On your Drupal admin setup, let’s go ahead and install the Marketo MA module from here. Next, go to Extend and enable the following modules (as shown in the below screengrab):
- Marketo MA User
- Marketo MA Webform
- Marketo MA
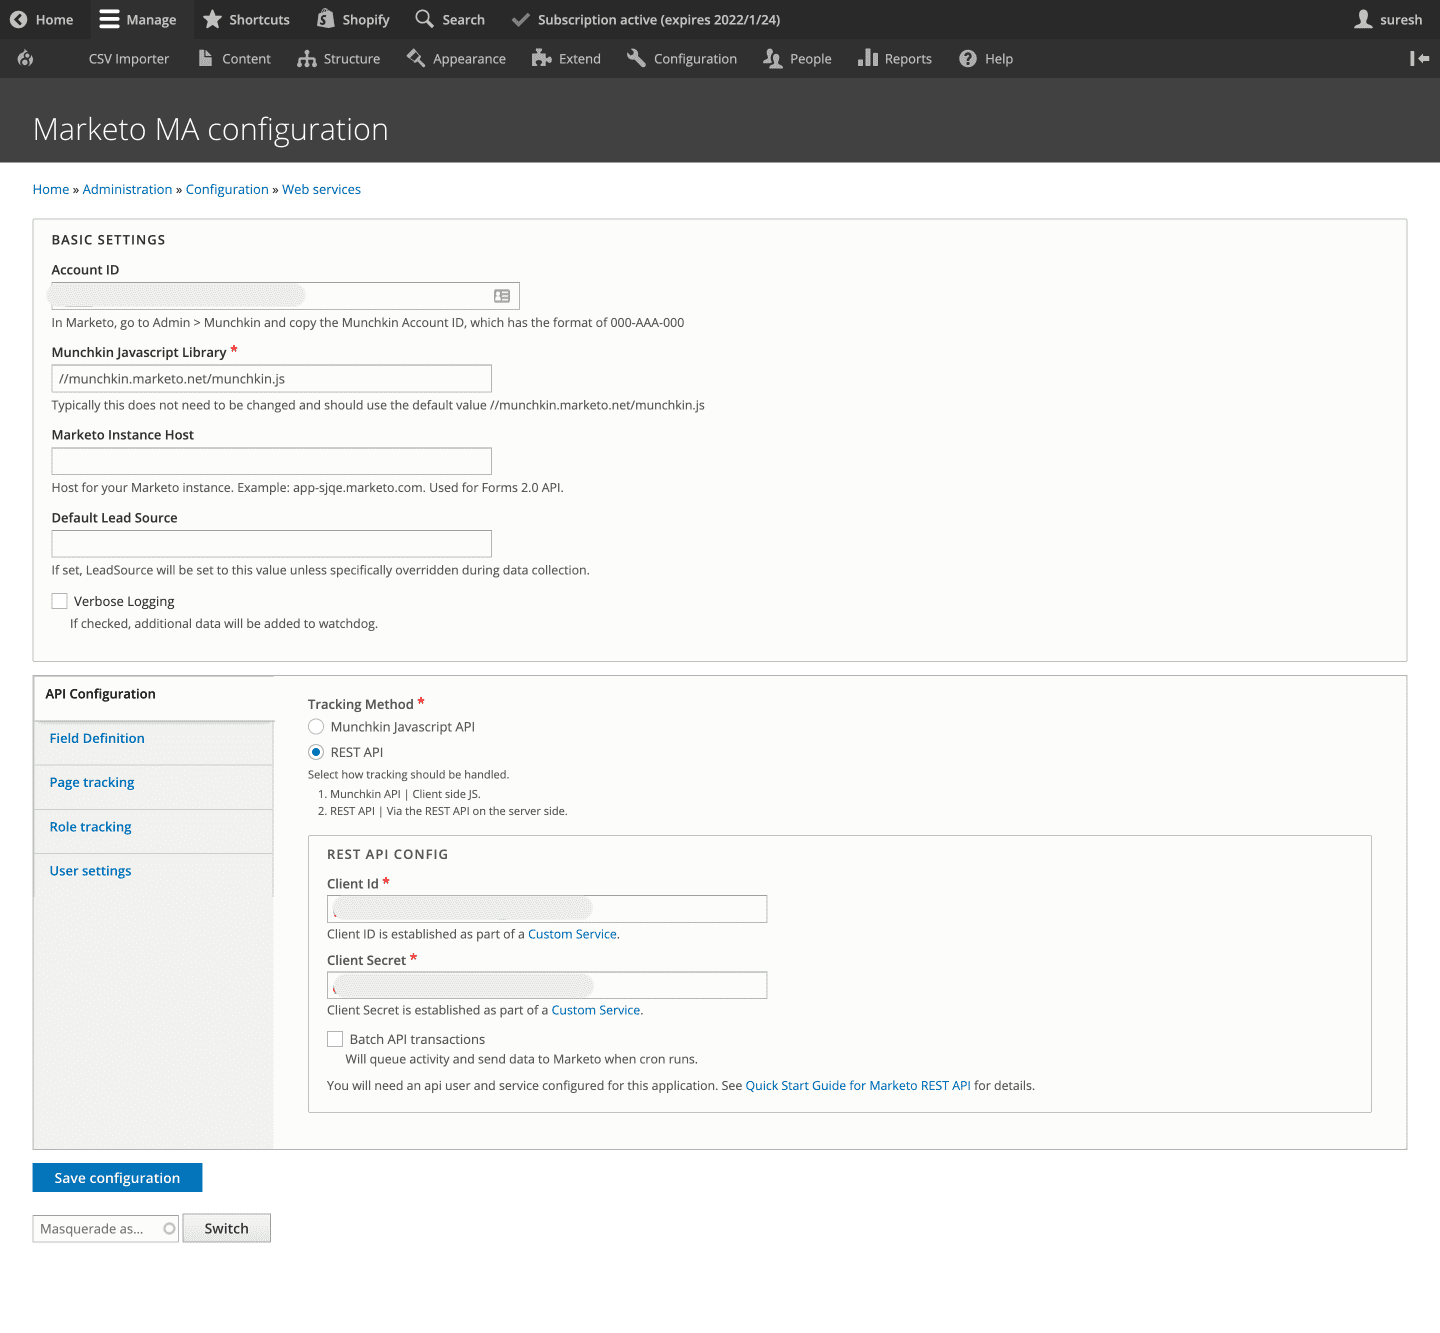
API Configuration
Now, let’s activate your Marketo integration by entering the Marketo account ID and other lead capturing details. Here, we are going to use the REST API method to track lead data instead of Munchkin JavaScript API. So, go ahead and enter the REST API configuration settings like the Client ID and the Client Secret.
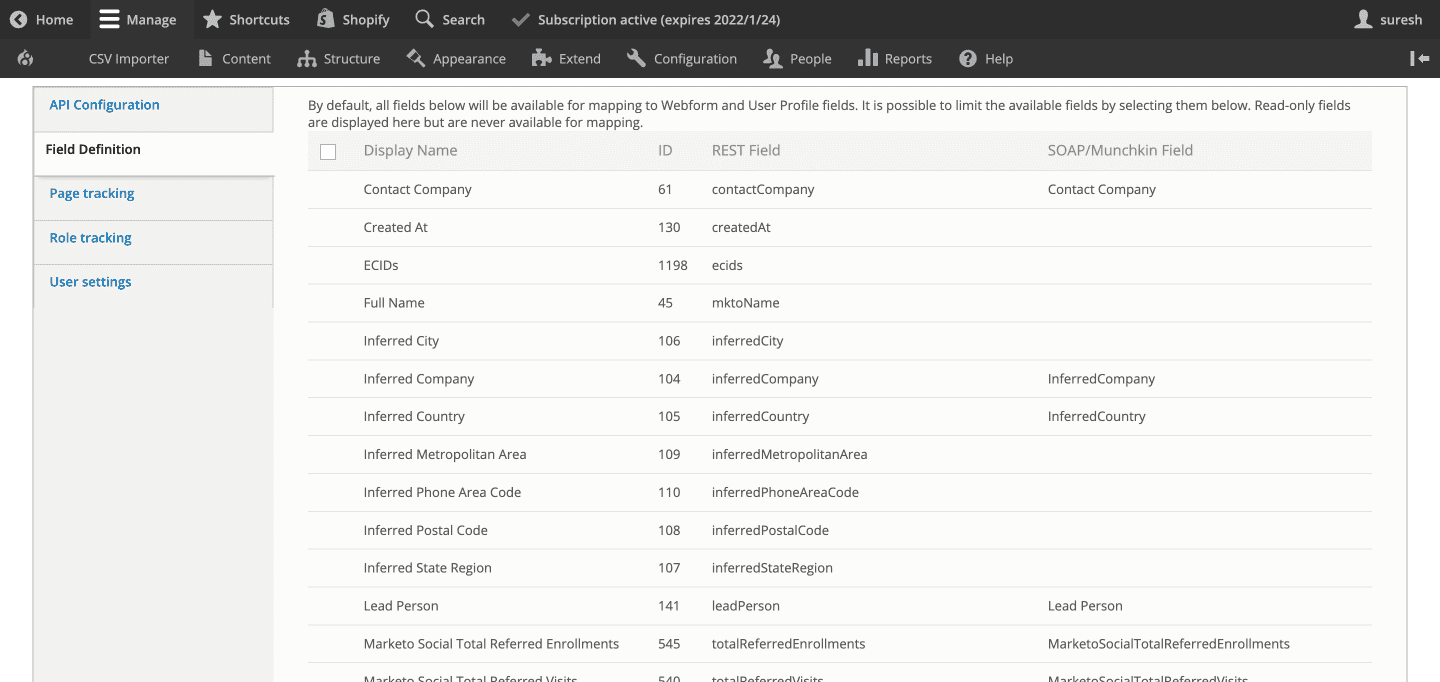
Field Definition
Here’s where you configure and map your user and Webform fields to the fields defined in your Marketo account (as shown in the below screengrab).
User Settings
In this section, you can enable a trigger to update the lead in Marketo during events like a User login, registration/creation, and an update to the user profile. You can also choose the User fields that should trigger the update and map it to the Marketo field.

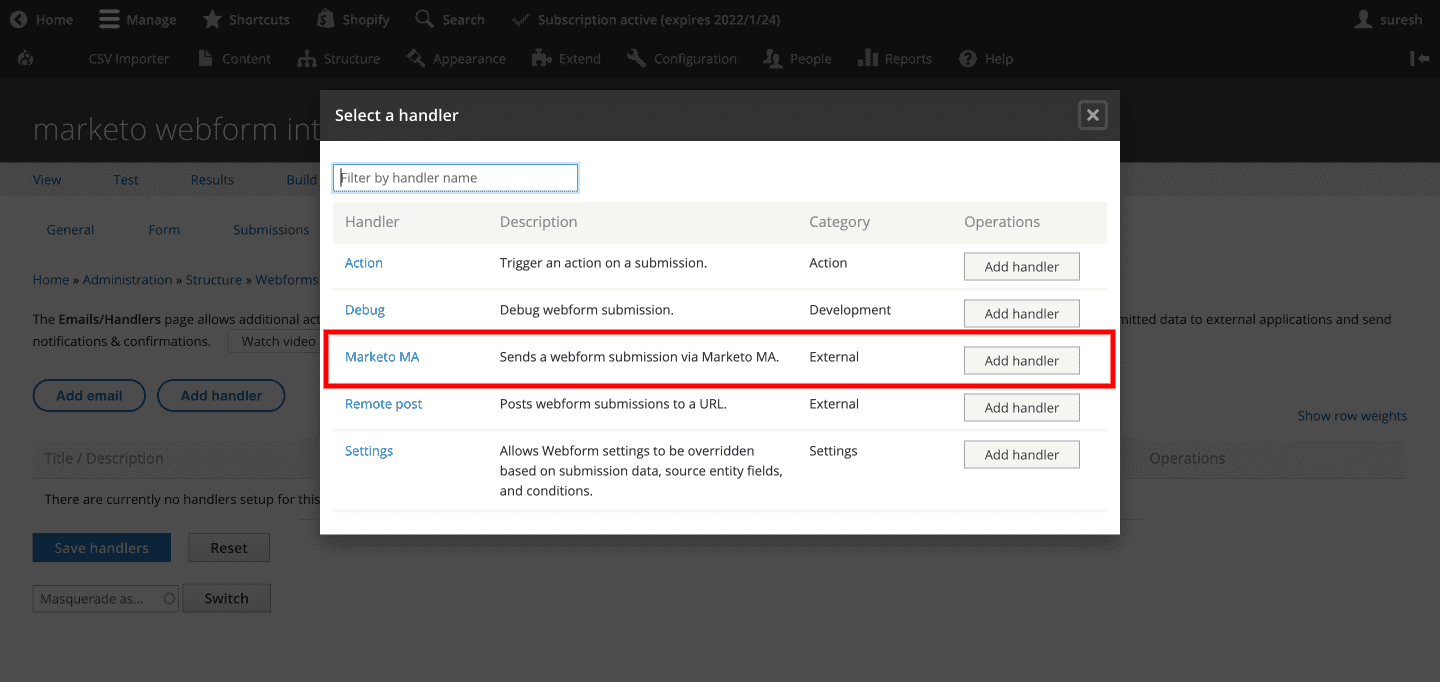
Adding the Webform Handler
Now select the Marketo MA webform handler to make sure that the lead is captured via webforms and sent to Marketo.
This setup will now let you add lead capturing, tracking, and nurturing capabilities on your Drupal site. You are now ready to send leads from Drupal to your Marketo platform.
How to Configure a Webhook to get Updated Lead Data from Marketo to Drupal
Your leads can come in from different sources. Several of your leads come in through your website's webform, while others may be entered directly into Marketo's dashboard through different marketing channels.
Sometimes, the user data that is captured and sent over from your Drupal site might get updated on the Marketo dashboard. What happens when you need real-time updated data from Marketo to personalize Drupal content for that user?
The Use Case
Recently, our client’s Drupal website required us to create a Webhook for their content personalization needs. They have a single sign-on system where their users can log in once and can access multiple site areas like events, member login, and shopping. Now after logging in, the content is personalized on the Drupal website based on content segmentations like demographics, job levels, etc. This needed our Drupal site to have updated user data that is synchronized in real-time with their Marketo system.
One not-very-feasible solution would be to make an API call to fetch get lead data from Marketo on user sign-in. However, not only is this method going to slow down the process, but it also proves more expensive as API requests are billed.
The Solution - Webhooks
Webhooks are basically API requests that are triggered by specific events. Marketo lets you register webhooks to connect to different third-party applications. For this use case, we configured a webhook to get real-time data from Marketo into the Drupal website. Let’s dive into the steps taken to implement webhooks for the Drupal Marketo integration.
Step 1: Create a custom module and define a route for API
First, you need to enable the HTTP Basic Authentication module in your Drupal setup.
marketo_webhook.routing.yml
marketo_webhook.webhook:
  path: '/webhooks/marketo'
  options:
    _auth: [ 'basic_auth' ]
  requirements:
    _user_is_logged_in: 'TRUE'
  defaults:
    _controller: '\Drupal\marketo_webhook\Controller\MarketoWebhookController::getMarketoLeads'
  methods: [POST]
Step 2: Create a controller for the API and store the data in custom fields
<?php
namespace Drupal\marketo_webhook\Controller;
use Drupal\Core\Controller\ControllerBase;
use Drupal\Core\Entity\EntityTypeManagerInterface;
use Symfony\Component\DependencyInjection\ContainerInterface;
use Symfony\Component\HttpFoundation\JsonResponse;
use Symfony\Component\HttpFoundation\Request;
/**
* Controller for Marketo Webhook.
*/
class MarketoWebhookController extends ControllerBase {
 /**
  * The entity type manager.
  *
  * @var \Drupal\Core\Entity\EntityTypeManagerInterface;
  */
 protected $entityTypeManager;
 public function __construct(EntityTypeManagerInterface $entityTypeManager) {
   $this->entityTypeManager = $entityTypeManager;
 }
 /**
  * {@inheritdoc}
  */
 public static function create(ContainerInterface $container) {
   return new static(
     $container->get('entity_type.manager')
   );
 }
 /**
  * Update user marketo fields.
  */
 public function getMarketoLeads(Request $request) {
   $payload = json_decode($request->getContent(), TRUE);
   $payload_log = implode(',', $payload);
   \Drupal::logger('marketo_webhook')->notice($payload_log);
   if($payload){
     if($payload['mail']){
       $users = $this->entityTypeManager->getStorage('user')
         ->loadByProperties(['mail' => $payload['mail']]);
       $user = reset($users);
       if ($user) {
         if($payload['field_job_function'] != 'NA'){
           $user->set('field_job_function',$payload['field_job_function']);
         }
         $user->save();
         return JsonResponse::create('Success', 200);
       }
     }
   }
   return JsonResponse::create('Success', 400);
 }
}
Step 3: Create the Webhook and Marketo Integration
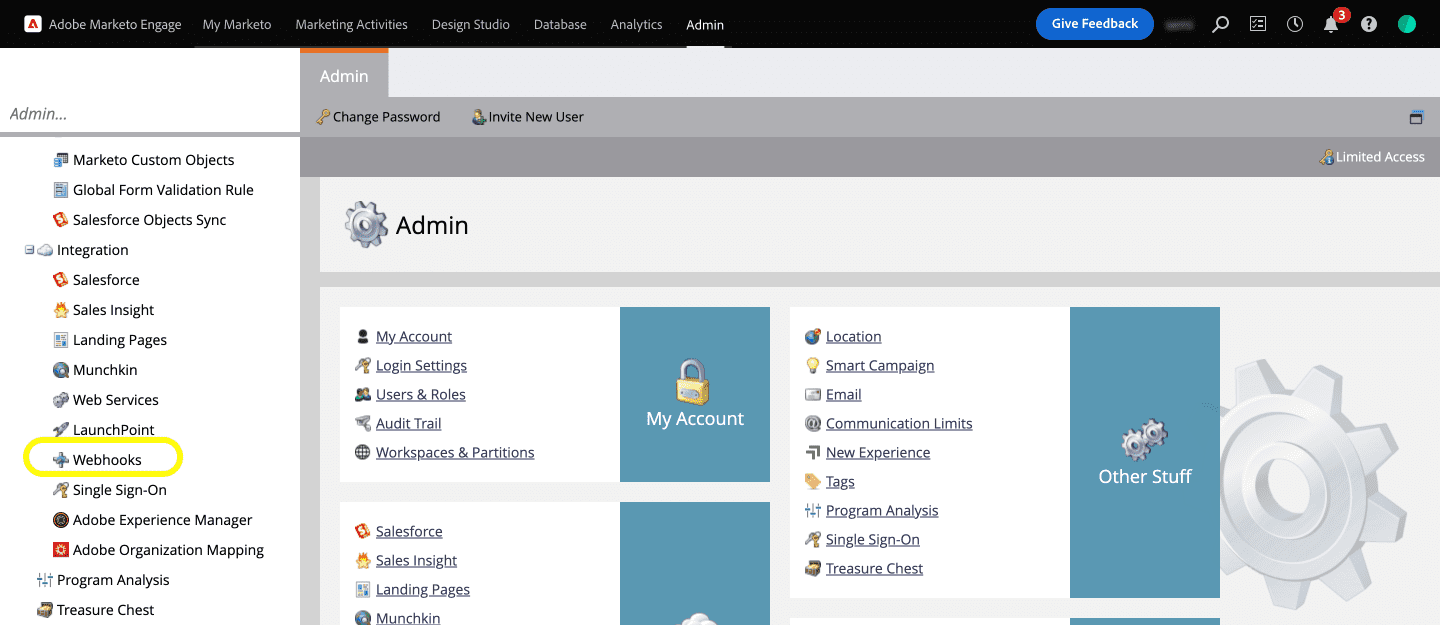
But first, you will need to register the Webhook. To register the Webhook on Marketo, let’s first hop on to our Marketo dashboard and click on the Webhooks option under the Admin >> Integration menu (as shown in the below screengrab).
Next, create a New Webhook which will open up a dialog box where you can enter details like the Webhook Name, Description, URL, Request Type, Template, etc.
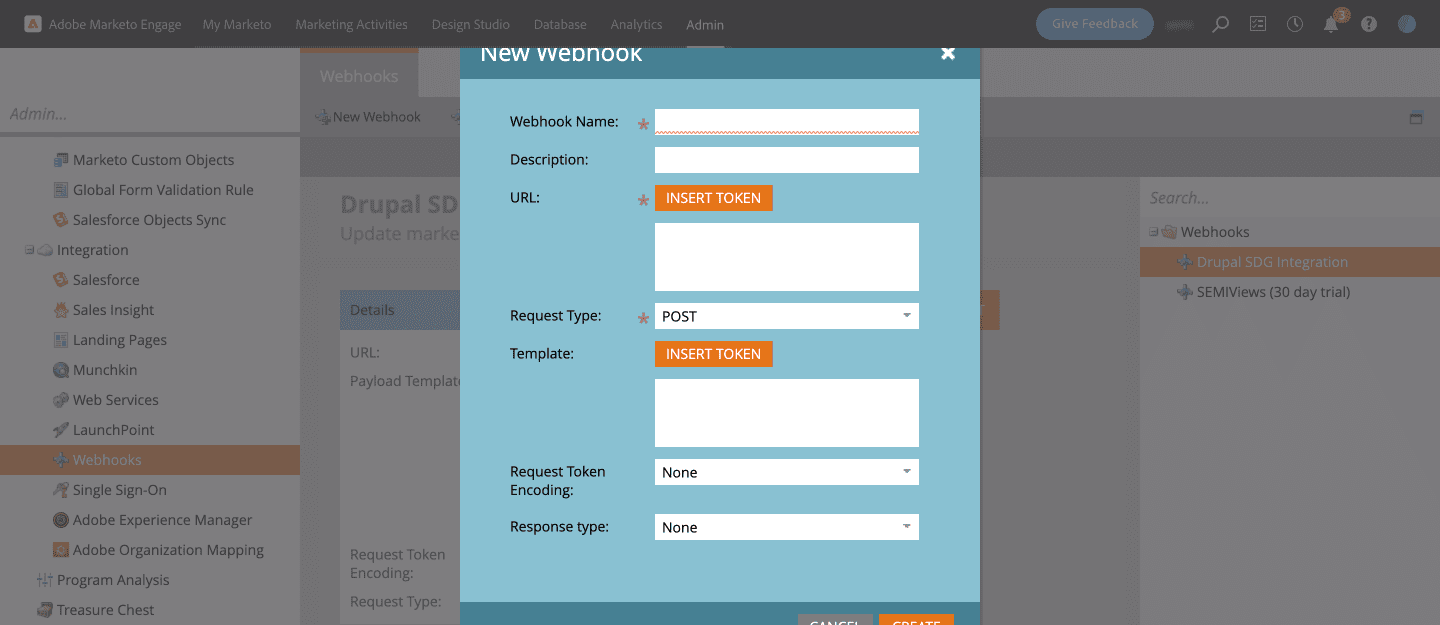
Give a name to the Webhook and an easily understandable description. Enter the URL to submit the web service request.
For example, here:
https://www.specbee.com/webhooks/marketo
is the API endpoint for our webhook.
Add the Drupal username and password for basic authentication like mentioned below:
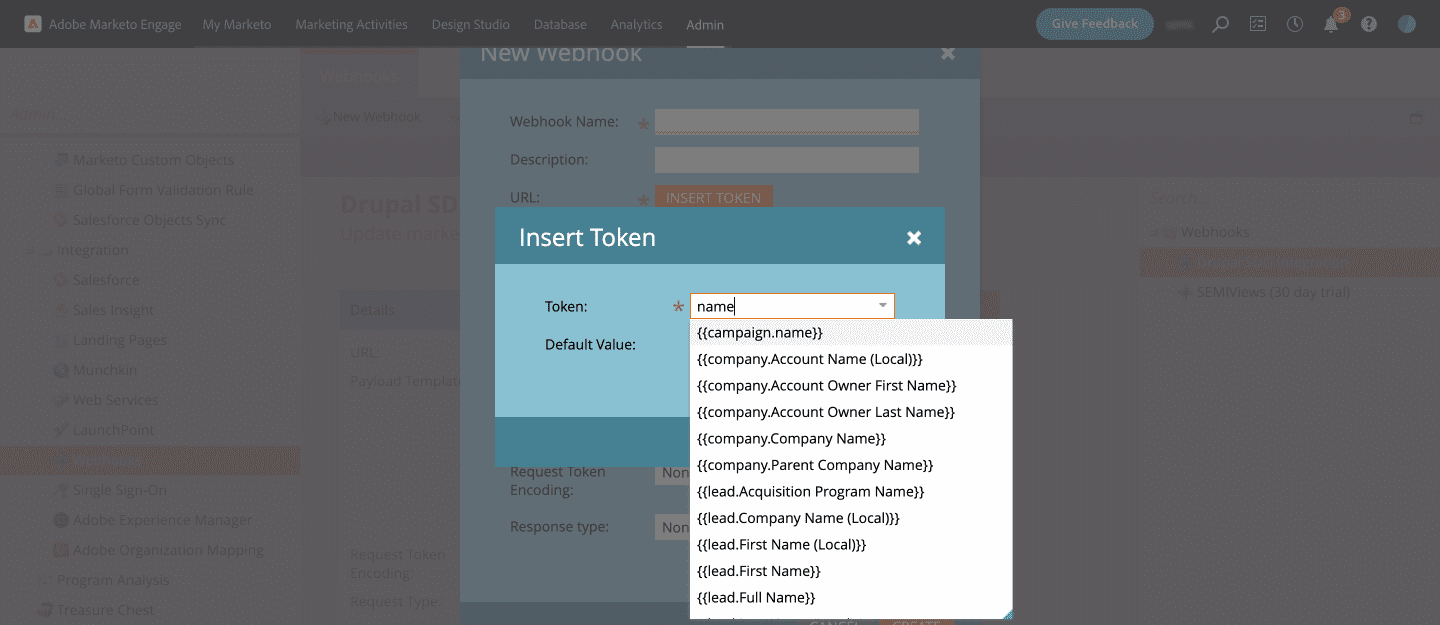
https://username:[email protected]/webhooks/marketoClick on the Insert Token button next to Template to add fields of the Marketo object that you want to pass with the request.
For example: "field_job_function": "{{lead.Job Function:default=NA}}". Set default value to any key of your choice. ‘NA’ in our case. This will return NA if there is no data.
Step 4: Create a Smart Campaign
To create the Webhook Marketo Integration, you will now need to set up a Smart Campaign. You can define your own Smart campaigns in Marketo that will run Marketo programs like calling a Webhook, sending out emails after a certain event, etc. A Smart campaign configuration has three parts: Smart List, Flow, and Schedule. You will need to add the trigger to the Webhook under Smart List.
- Under Marketing Activities and within your program, create a new Smart campaign.
- Give the Smart Campaign a name and a description. Here we have called it Drupal Integration.
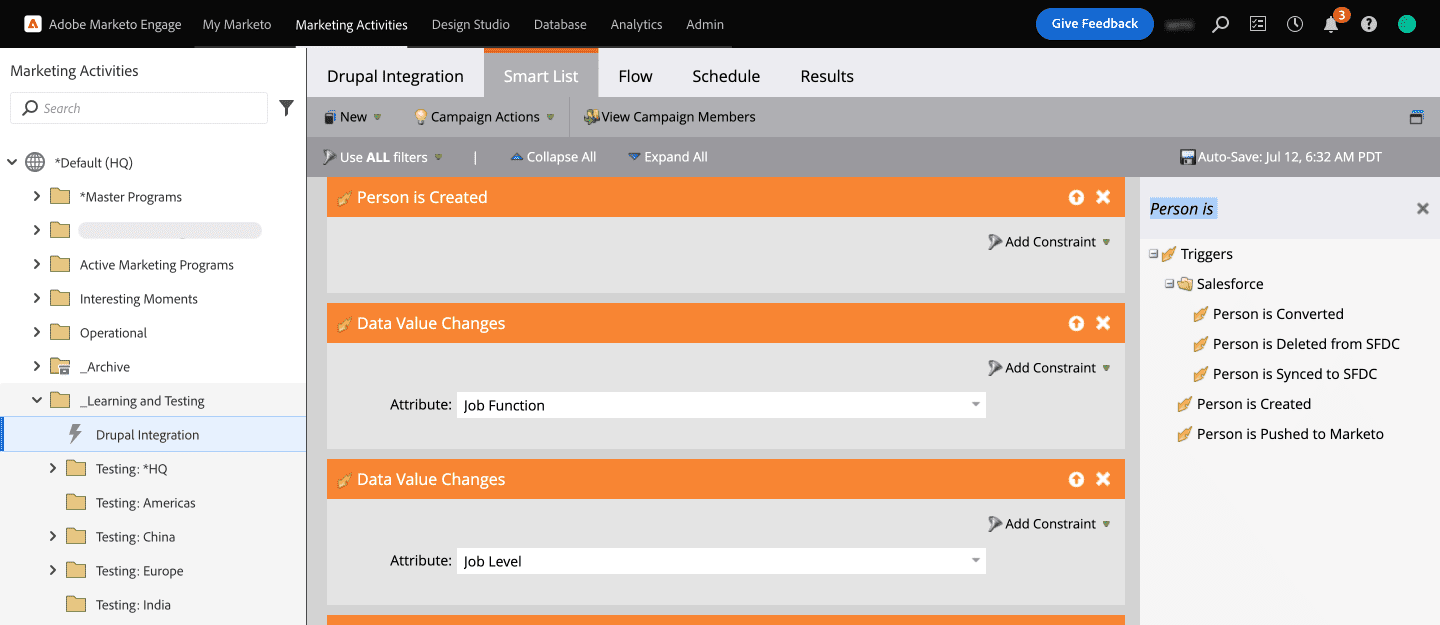
- Under Smart List, you will find all available Triggers. Drag and drop the triggers you need into the Smart List. Here, we have selected the Person is Created trigger but this will trigger only when a new lead is created. To solve this, let’s go ahead and add another trigger for Data value changes so that it gets fired when there is an update in the lead data.
- We have selected the Job Function and Job Level attributes under Person to trigger the webhook (as shown in the below screengrab).
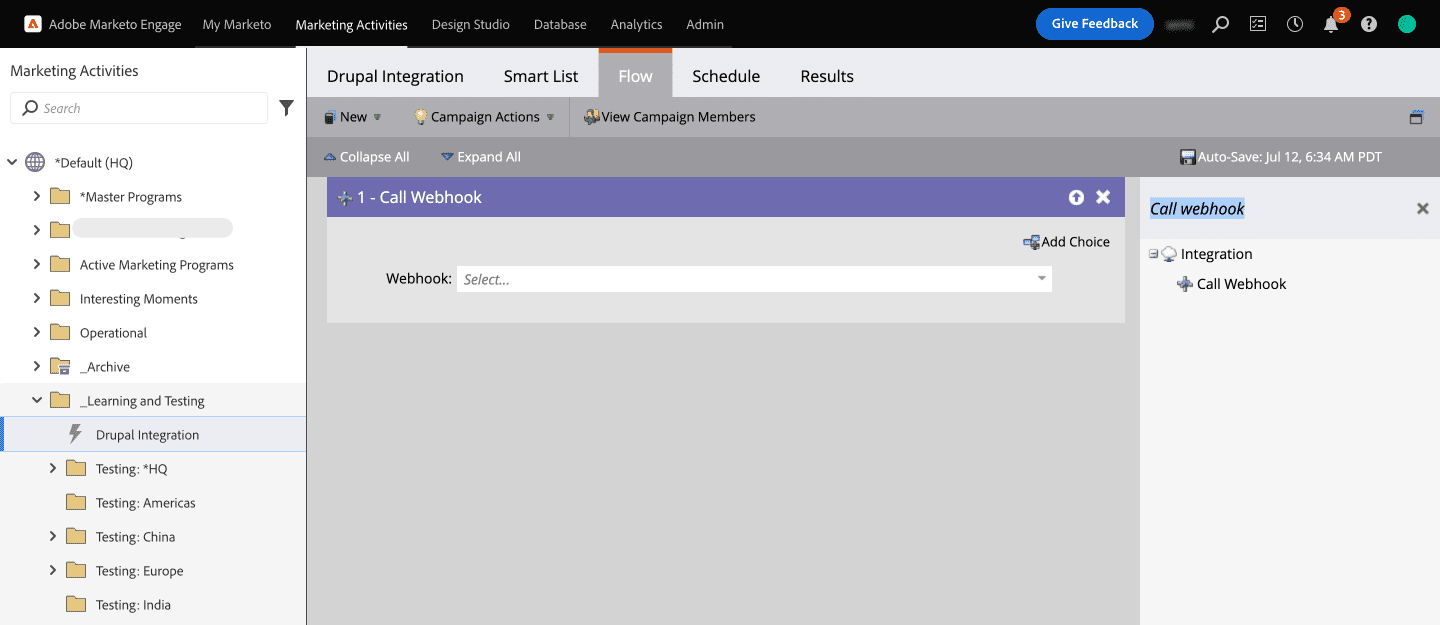
- Now, time to call the Webhook. Click on Flow and select the Call Webhook flow action on the right pane and drag it to the Flow. Select the name of the Webhook you created.
- Now that you have created the campaign to call the Webhook, let’s schedule it.
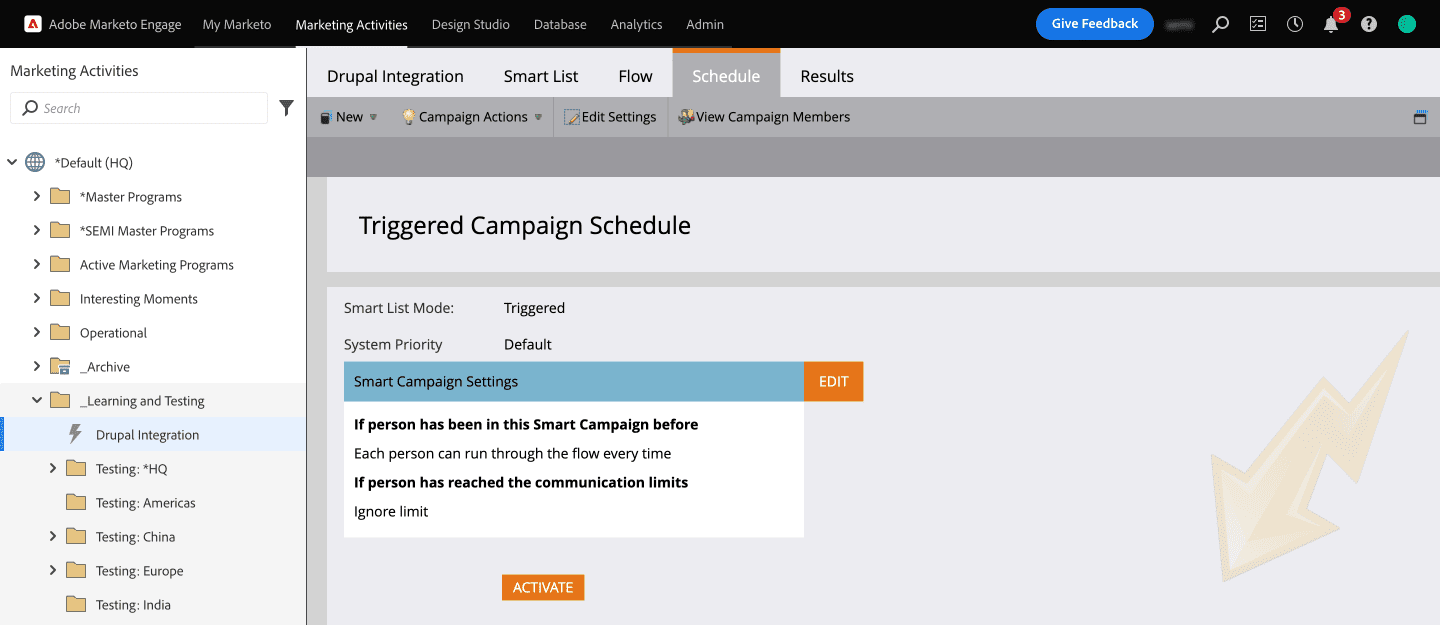
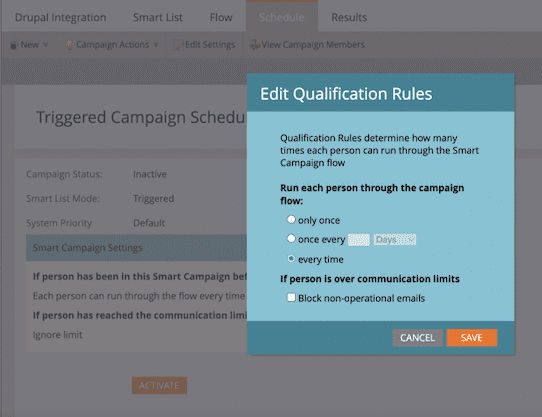
- In the Smart Campaign Settings click on the Edit button to set how often you want the campaign to run. For our use case, we have selected “every time” as we wanted the webhook to fire up every time a lead data gets updated. Save that setting and click on ACTIVATE.
Step 5: Test it out!
Your campaign is now ready to test. You will be able to see all the activities, that is, the number of calls to the Webhook and other details under the Results tab of the Smart campaign.
So ideally, when you create a new lead (Person) or update the Job level or Job Function field of an existing lead, it should call the Webhook and get the lead updated in your Drupal website’s database as well.
This article would not have been possible without Prashanth’s help! Thank you!
Final Thoughts
Marketing automation platforms like Marketo can be a valuable addition to any organization's marketing strategy to help engage, nurture, and ultimately convert leads. The use of Drupal as a content management system streamlines these activities. In this article, along with showing you how to integrate Marketo with Drupal, we have also covered how to configure webhooks that can let you get updated lead data from Marketo to Drupal. Need help customizing Drupal integrations with Marketo or any other third-party application? We’d be happy to help!