Migrating data from any source to Drupal 8 is now made simple with various modules that allow easy data transfer. Migration in Drupal is a term for any process that moves data from an external source to the current Drupal site. You can migrate data that includes nodes, users, configuration, and any other components of the site.
Drupal provides you many ways to migrate content. Depending on the website and source of the data, you can choose the best way to do it. However, migrating multilingual data can add a few more steps to your migration process. You will first need to migrate the base content and then migrate the translations. In this article, we will elaborate on these steps to help you get a better understanding of migrating multilingual content from CSV to Drupal 8.
Drupal 8 Migration Modules You Will Need
As mentioned earlier, Drupal offers tons of options and modules that can help you with an easy, hassle-free migration. For migrating multilingual content, you will need:
- Migrate: Provides a flexible framework for migrating content into Drupal from other sources.
- Migrate plus: Provides plugins for migrations like source plugins, process plugins, destination plugins and API extensions.
- Migrate Drupal: Provides support for migrating content and configurations.
- Migrate source CSV: Provides a plugin to import contents to Drupal from a CSV file.
- Migrate tools: This module gives UI tools and Drush commands used for migration.
- Configuration development module: This module converts script into configurations.
Step 1: Migrating the base content
To begin with migrating the base content, we will first need to create a custom module in Drupal 8.
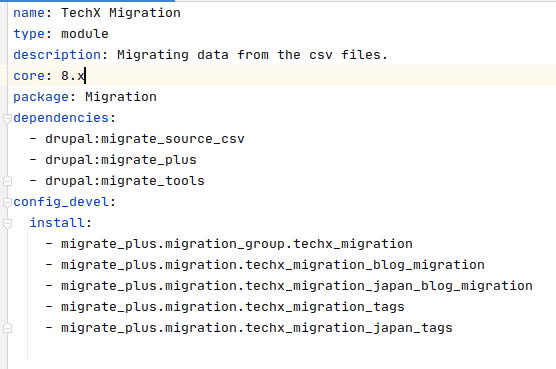
Make sure that the info.yml has these keys and values.
You will need to create yaml files, which are known as migration scripts, and place it in the config/install directory of the custom module created. The config_devel/install key of info.yml should have all the yaml files written.
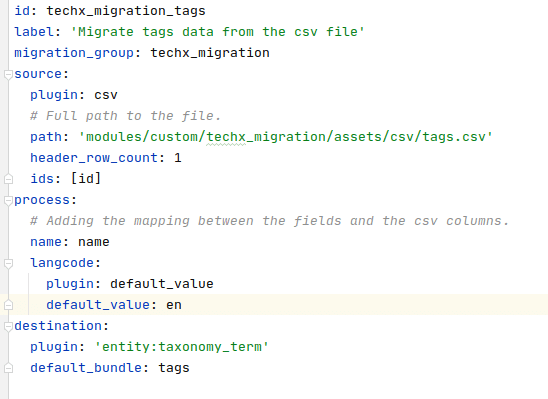
This is a sample yaml file for importing taxonomy terms. The migration script has 4 sections:
- Metadata: will have the id, label, and migration group id.
- Source: The source key should have the path to the CSV file.
- Process: The mapping between the fields and the CSV columns.
- Destination: The destination where the imported data is saved.
The yaml file node contents should be written similarly. The only difference being the destination.
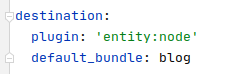
The destination plugin should be entity:node and the default_bundle will have the machine name of the content type to which the content is imported.
After creating all the yaml files, the IDs of the yaml should be included in the info.yml. Once everything is done, enable the custom module.
Use the Drush command drush cdi <migration id>. Here the migration id is techx migration. This will convert the script into configurations.
After running the command go to admin>structure>migration. You will find the migration group you created by clicking on list migration. This will show you the list of the migration scripts created.
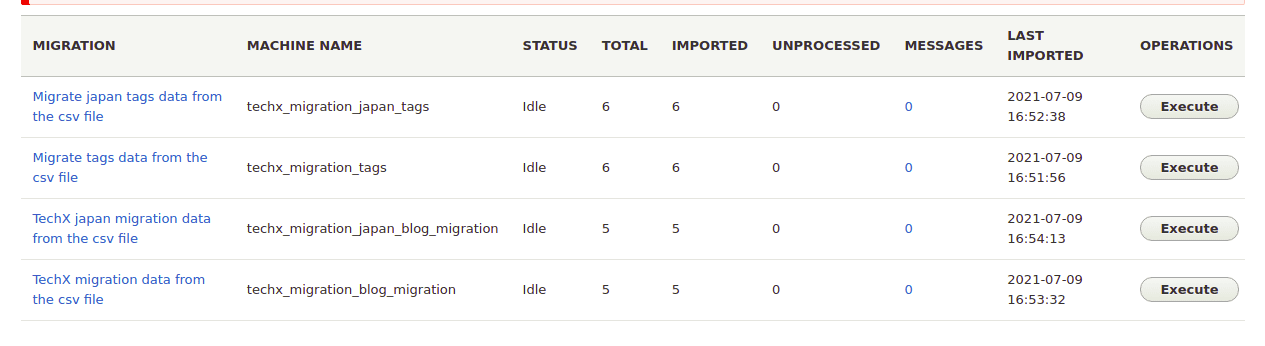
Clicking on execute tab will show the list of operations available:
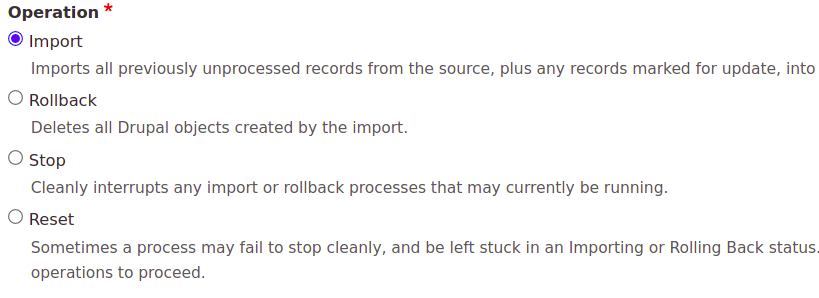
Import is to pull the data from the source.
Rollback will delete the data imported.
The Stop is to interrupt the import or rollback process.
Sometimes a process gets stuck. To move the status to idle, Reset is used.
For a more detailed information on how to migrate the data of different entities like the user, paragraph, check CSV Import to Migrate Drupal 7 to 8 - A complete guide.
Step 2: Migrating the translations of the base content
If you already have enabled multilingual content on your Drupal 8 website, you can skip the first step. If you want to know how to create multilingual Drupal 8 websites (and why you might need one), check out this article.
1. Adding language to the Drupal website
To import translations, first we must make our website multilingual. Let us see how to download languages to the site.
- Enable the Language and Content translation module. These are core modules.
- Go to /admin/config/regional and language/language/add language.
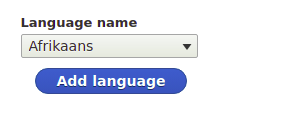
- Clicking on the dropdown gives you a list of languages. Select the language you want on the site and click on Add language. This will download the language for your site.
2. Enabling translation for entities
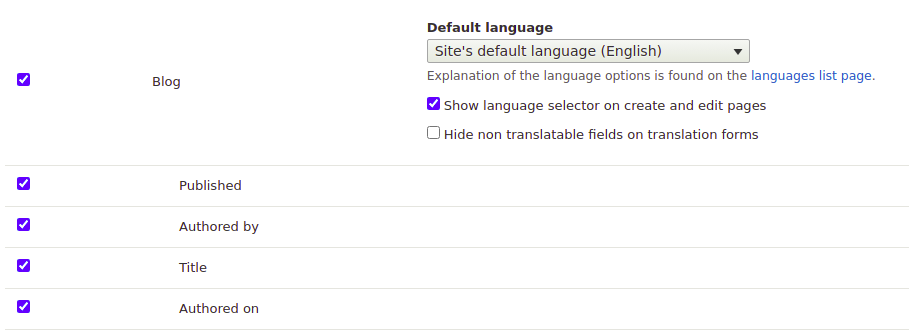
Once we have installed the languages we need, we must enable the translations for the entities before importing or adding the translations to the content. For this, go to admin/config/regional/content translation. Select the entities to which you want to enable the translation and click on Save configurations.
In this example, I am importing the blog content type and thus I will enable translation for blog content type.
3. Update the migration files
There are some changes that need be made on the yaml files to import the translations. Give the path of the CSV file of translated content as a base contents and translated contents are stored in different files. Changes in term translation.
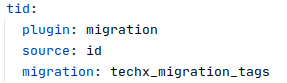
Add a new key tid in the process section of the script with the plugin as migration, source as id, and migration value should be the migration id of its base content migration script.
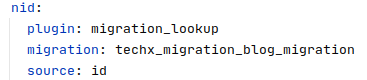
For node migration add a new key nid in the process section. Here the migration key will have the value of the migration id of its base content migration script.
Another key should be added is translations with the value set to true. This should be added in the destination section of all the translation migration scripts irrespective of the entities.

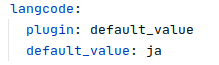
Define the language to which the translation is imported using the langcode key. In this example I am importing Japanese translations, so the value will be ja.
These changes tell the script to take the id of the content from the base content migration from which these contents are treated as translations rather than a new node.
Points to remember
- The importing process should go in order. For example, if the terms are referred to in the node, the terms should be imported first before the node contents.
- Enable the translation for the entities before importing the translations.
- The order of translation contents in the CSV file should be the same as the base content. That is, the base content and its translations should be in the same line in the CSV file.
- Import the base content first then the translation content. Else both will be treated as individual contents.
Having multilingual content allows you to reach a wider audience and create a better connect with the audience. Migrating multilingual content in Drupal does not have to be a tedious process if you use the right Drupal 8 modules and follow the steps as described in this article. Got questions on this or want help in migrating your multilingual website to Drupal 8 (or 9) ? We can help! Please reach out to us here and we’ll get in touch with you asap!

Suresh Prabhu
Related Insights

Don't Miss Out!


